Content from Prac00: Introduction to Linux
Last updated on 2024-10-02 | Edit this page
Overview
Questions
- How do I login in to the Virtual Machines?
- Where do I find and access files in Linux?
- How do I create and run a program using Linux?
Objectives
- Define and use key commands in the Linux operating system
- Edit files using vim
- Run simple Python code in a Linux environment
Introduction
This practical will give a gentle introduction to Linux. It can be done before or after the first lecture - but do not delay as we’ll need everything from this lesson to build on in future weeks.
In class you will be accessing a Linux environment (operating system) through a web browser. We will connect to a Virtual Machine - using servers in the cloud which can run multiple “virtual” machines at once. These, in turn, connect to fileservers where you can store your files and access them from any Curtin computer, or from your home machine(s).
Note: If you are working remotely, or are not on Bentley Campus, you may have an alternative setup to access Linux. Your Lecturer will guide you through Activity 0.
That may be too much information for right now… so let’s dive in and find out how to use Linux!
Activity 1 - Accessing Linux
In the laboratory:
- login to the machines with your Oasis login.
- Once you’re connected, open a web browser and go to mydesktop.curtin.edu.au.
- You can choose either the install or HTML option, but for the labs we will use VMware Horizon HTML Access. You’ll need to login again, making sure to select STUDENT.
- Choose either Computer Science Linux Lab or Curtin Global Linux - this tells the system which flavour of operating system you want to use. (they are both the same, but can be useful as options when we have technical issues)
- It will take a few minutes for all the icons to arrive, so this is a good time to get your screens setup - one for the prac sheet/page and the other for working in Linux is recommended.
- Your screen should look something like this…

Activity 2 - The Command Line
Now we need to open a terminal window to interact with the Linux computer. There is a graphical (GUI) interface, however the command line is more powerful (eventually).
The terminal application is on the left of the screen (a black rectangle). We can make sure it points to the correct area for your files by opening the I: drive icon and then right-clicking to get a pop-up menu and select open in terminal.
There are a lot of commands you can use in Linux, but you only need a few to get started. A sample of the Unix commands available to you have been provided below. We will learn more commands as we go through the unit.
Try typing the following commands (one at a time) and check what they do…
ls
ls –l
pwd
mkdir test
ls
cd test
ls
ls –la
Here are a few of the most common commands… the < > braces are a convention to indicate text that you replace. Note that in Unix/Linux folders are referred to as directories.
| Command | Description | Examples |
|---|---|---|
| ls | Lists all files in the current directory, if an argument is provided lists all files in the specified directory. | ls, ls –l, ls –la |
| cp |
Copies the file from source to destination. | cp Downloads/test.py ., cp test.py test2.py |
| mv |
Moves the file from source to destination. If the destination ends in a file name it will rename the file. | mv test.py Prac1, mv test.py mytest.py |
| pwd | Lists the directory you are currently in (Print Working Directory) | pwd |
| cd | Moves to | |
| mkdir | Creates a new directory | mkdir Prac1 |
| rm |
Removes a file | rm fireballs.py |
| rmdir | Removes a directory (must be empty first) | rmdir Prac12 |
Using these commands create the following directory structure within
your home directory. A How to use Unix and cheatsheet document
has been uploaded to Blackboard, it will be helpful if you get stuck.
Note you can use the arrow keys to get back to previous commands, and
can use
- FOP
- Prac00
- Prac01
- Prac02
- Prac03
- Prac04
- Prac05
- Prac06
- Prac07
- Prac08
- Prac09
- Prac10
- Prac11
The current directory is referenced by a single fullstop (.), the parent directory is referenced by two fullstops (..) and all pathways are relative to the current location.
For example…
cd FOP/Prac01
cd ../Prac00
…takes you into FOP/Prac01, then on the second line, back up and into Prac00
Activity 3 - Introduction to the Text Editor (vim)
We are going to use the vim text editor to create your README file for Prac01. Vim is an enhanced version of vi – a visual, interactive editor. There is an Introduction to Vi document and a “cheat-sheet” on Blackboard, but you should work through this prac before try ing it.
If you’re not already there, change directory into the Prac00 directory and create the README file:
> cd Prac00
> vim README
You will now be in the vim text editor with an empty file. Vim has two modes – command mode (where you can move around the file and use commands) and insert text mode. Type “i” to go into insert mode and type in the following README information for Practical 1.
## Synopsis
Practical 0 of Fundamentals of Programming COMP1005/5005

## Contents
README – readme file for Practical 0

## Dependencies
none

## Version information
<today’s date> - initial version of Practical 0 programs
Press <esc> to exit insert mode, then :wq to save
the file (w) and exit vim (q). Type
ls -l(-l for long listing) and you will see that you have created a file called README, and it has a size and a date. We will make README files for all of our practicals to hold information about the files in that directory.
Activity 4 - Welcome to Python!
Below is a simple program to get you used to the editor and running python scripts. To create a file for the program, type:
vim hello.pyThen type in the following code… It is important to type it yourself and not copy/paste – this is how you will learn and remember!
PYTHON
#
# hello.py: Print out greetings in various languages
#
print('Hello')
print("G'day")
print('Bula')
print("Kia ora")
To run the program, type:
python3 hello.pyYou will probably get an error message as a response (unless you
typed it in perfectly). Don’t worry, check through your code for the
error and try running it again. Go back into the file and make
corrections – use the cursor keys to get to the position (
- to delete a character type “x”
- to delete a line “dd”
- to delete a word “dw”
- to change a word “cw”
- to insert/append after the end of the current line, type “A”
- to undo the last command, type “u”
- to redo the last command, type “.”
Save the file and try to run it again. If you’re having trouble, ask your tutor, or even the person next to you, to see if they can find what’s wrong. Sometimes it takes someone else’s fresh and/or experienced eyes to see an error. This is called “debugging” and the reward comes when the code finally runs!
Try adding some more greetings of your own…
Activity 5 - Updating the README
You now have a program and a README in the Prac00 directory. Enter the name of each of them along with a description under “Contents” in the README file.
Activity 6 - Making and submitting a zip file
To bundle up and compress files we can use zip/unzip. Similar programs are tar (Tape Archive) and gzip (GNU zip).
To make a zipped file for Practical 0, go to the Prac00 directory inside your FOP directory. Type pwd to check that you are in the right place.
Create the zip file by typing:
zip Prac00_<your_student_ID> *

e.g. zip Prac00_12345678 *
This will create a file Prac00_
unzip –l Prac00_<your_student_ID>.zipActivity 7 - Submission
All of your work for this week’s practical should be submitted via Blackboard using the Practical 0 link. This should be done as a single “zipped” file. This is the file to submit through Blackboard.
There are no direct marks for these submissions, but they may be taken into account when finalising your mark. Go to the Assessment link on Blackboard and click on Practical 0 for the submission page.
And that’s the end of Practical 0!
Key Points
- We will be using Linux as our operating system for this unit
- You can access Linux through mydesktop.curtin.edu.au or install Python and a “Linux” shell on your home machine
- Working on the command line, we will type in commands at the prompt, press enter, and wait for the computer’s response
- To create and edit a text file, we will be using vim - a program for editing text files
- Once we have entered a Python program as a text file, with a “.py”
extension, we can run the program by typing
python3 myprog.py
Reflection
- Knowledge: What are the two modes in vi / vim?
- Comprehension: What is the name of the lab machine you are working on? Hint: use the hostname command or look at the prompt.
- Application: What series of commands would you need to go to the directory FOP/assignment in your home directory and compress all the files?
-
Analysis: The code
print("G'day")uses two types of quotation marks (single and double). What would happen if they were all single quotes? -
Synthesis: The code in
hello.pyis a bit repetitious. What commands in vim can help you save time writing such code? (hint: you can copy and paste the common code, then edit it) - Evaluation/Reflection: What part of the prac did you find most challenging? (You can give feedback to the lecturer/tutor…)
Challenge
For those who want to explore a bit more of the topics covered in this practical.
- Work through a Linux tutorial
- Work through a vi/vim tutorial
- Read some samples of README files for large projects - https://github.com/matiassingers/awesome-readme
Content from Prac01: Introduction to Python
Last updated on 2024-10-02 | Edit this page
Overview
Questions
- How do I interact with a Python program?
- How can I get Python to run different pieces of code, based on a condition?
- What ways can I have Python repeat code?
- How do I apply this to a real-world problem?
Objectives
- Continue to use key commands in the Linux operating system
- Request user input in Python
- Create and work with variables and values of different types
- Define and use control structures
- Use Python to model a simple system
Introduction
In this practical you will continue to use Linux and the vim text editor - look back to Practical 00 to refresh yourself on those commands. The first activity sets up the directory structure for the practical.
We will be looking at accepting user input (Activity 2) and control structures (Activities 3-6). In Activity 7 we will write a program to implement a simple systems dynamics model.
Activity 1 - Setting up for the practical
We’re going to make a more complex directory structure for this practical. This will exercise your Linux skills for creating and traversing directories. The overall structure will be:
FOP
 |-- Prac00
 |-- Prac01
   |
   |-- The
   |   |-- Holy
   |   |   |-- Grail
   |
   |-- Monty
   |   |-- Pythons
   |       |-- Flying
   |           |-- Circus
   |-- And
       |-- Now
           |-- for
               |-- Something
                   |-- Completely
                       |-- Different
Each indent is a subdirectory. You might create each directory, then
cd into it, then create the subdirectory:
cd FOP/Prac01
mkdir The
cd The
mkdir Holy
cd Holy
mkdir Grail
cd ../..
Or you can stay in the original directory and give the path to each new directory:
cd FOP/Prac01
mkdir The
mkdir The/Holy
mkdir The/Holy/Grail
To see the overall directory structure, type ls -R and
you should have the output shown below:

If you make a mistake, you can delete a directory with
rmdir <dir_name>. Note that directories have to be
empty before they can be deleted - so work from the “leaf” of the
directory tree, back to the “root”.
There are ways to delete a directory tree in one command, but it is too dangerous to teach at this point. For now, we’ll do things the slow and safe way.
Challenge 1: Can you do it?
From the Prac01 directory, how would you change into the Grail directory with one command?
cd The/Holy/GrailActivity 2 - Interacting with Python Programs
Change directory to The/Holy/Grail. We are going to
write a program matching a scene from the movie “The Holy Grail”.
In the Grail directory, type in:
vim bridge.py
then type in the following code:
PYTHON
#
# bridge.py - a scene from The Holy Grail
#
print("Welcome to the Bridge of Death")
print("What is your name?")
name = input()
print("What is your quest?")
quest = input()
print("What is your favourite colour?")
colour = input()
print(name)
print(quest)
print(colour)
Run the program a few times to see how it works. The
input() call puts up a prompt for the user to enter text on
the keyboard. To store the input in a variable, we assign in using an
“=” sign: name = input(). We do similar for the quest and
favourite colour.
We can then output these variables using print statements.
Have you noticed that the code changes colour as you type? This is
syntax highlighting. When you’re in command mode in vim you can type
:syntax off and :syntax on to turn it
off/on.
Once you have that working, we can improve on the code and make it a bit friendlier. Edit the code again and make the changes below:
PYTHON
#
# bridge.py - a scene from The Holy Grail
#
print()
print("Welcome to the Bridge of Death")
print()
print("What is your name?")
name = input()
print("What is your quest?")
quest = input()
print("What is your favourite colour?")
colour = input()
print()
print("Hello,", name, "good luck with your", quest, "quest!")
print("Perhaps wearing", colour, "socks would help :)")
print()
There are many ways to solve a coding problem. Copy your code
bridge.py to bridge2.py and then change the
code to match the example below. The required commands are:
cp bridge.py bridge2.py
vim bridge2.py
PYTHON
#
# bridge2.py - a scene from The Holy Grail, re-coded
#
print("\nWelcome to the Bridge of Death\n")
name = input("What is your name?")
quest = input("What is your quest?")
colour = input("What is your favourite colour?")
print("\nHello,", name, "good luck with your", quest, "quest!")
print("Perhaps wearing", colour, "socks would help :)\n")
We always want to make use of the value collected in an
input() call, so we can combine the print and
input into a single line. Also, the empty
print() calls can be absorbed into the strings being
printed out, by including a \n to give a blank line. More
on that in Lecture and Practical 2.
Activity 3 - Control Structures: if_else
The previous code ran from the first line to the end, executing every
line, and will do so every time it runs. The if_elif_else
control structure allows us to choose between different pieces of code
to run. We just need to put a Boolean condition
(True/False) into the if or elif
and Python will evaluate it and choose a path through the code.
The indenting indicates the start and end of each
if_elif_else clause. Reducing the indent closes the clause,
continuing the indent extends the included block.
As an example, enter the following code, bruces.py, in
the directory Monty/Pythons/Flying/Circus:
PYTHON
#
# bruces.py - let's call everyone "Bruce", to avoid confusion
#
name = input("\nHey cobber, what's your name? ")
if name != "Bruce":
   print("Sorry,", name,"- your name's not Bruce?")
   print("That's goin to cause a little confusion.")
   print("Mind if we call you 'Bruce' to keep it clear?")
   name = "Bruce"
print("G'day", name, "!!!\n")
We can enhance the program to congratulate anyone who is actually called Bruce… update the code as below.
PYTHON
#
# bruces.py - let's call everyone "Bruce", to avoid confusion
#
name = input("What is your name? ")
if name != "Bruce":
   print("Sorry,", name,"- your name's not Bruce?")
   print("That's going to cause a little confusion.")
   print("Mind if we call you 'Bruce' to keep it clear?")
   name = "Bruce"
else:
   print("Excellent! That saves a lot of confusion!")
print("G'day", name)
Challenge 2: Testing… testing…
Looking at the above code, what inputs might you use to test it is working correctly?
Enter “Bruce” and then something other than “Bruce” to test both paths through the code. Note that “Bruce” and “bruce” are not equal. Testing requires at least every path through the code is executed.
Activity 4 - Control Structures: if_elif_else + nesting
To work through some more complex if_elif_else code, we’ll write a program to identify the members of Monty Python:
| Name | Description |
|---|---|
| Graham Chapman | died 1989, cancer |
| John Cleese | not dead yet, moustached |
| Terry Gilliam | animator, not dead yet, bearded |
| Eric Idle | composer, not dead yet, clean-shaven |
| Terry Jones | died 2020, dementia |
| Michael Palin | not dead yet, traveller, clean-shaven |
For this exercise, enter your code as which.py in the
Monty/Pythons directory. Indenting must be correct for this
code to work! It can help to draw a flowchart to see/plan
the flow of logic in your code.
PYTHON
#
# which.py - asks questions to find your Python
#
print("\nFind the mystery Python!\n")
print("Enter Y/N to the following questions...")
male = input("Are you male? ")
if male == "Y":
    beard = input("Do you have a beard? ")
    if beard == "Y":
        mystery = "Terry Gilliam"
    else:
        alive = input("Are you still alive? ")
        if alive != "Y":
            dementia = input("Did you have dementia? ")
            if dementia == "Y":
                mystery = "Terry Jones"
            else:
                mystery = "Graham Chapman"
        else:
            mo = input("Do you have a moustache? ")
            traveller = input("Are you a traveller? ")
            if mo == "Y":
                mystery = "John Cleese"
            elif traveller == "Y":
                mystery = "Michael Palin"
            else:
                mystery = "Eric Idle"
else:
    print("Not *technically* a python, however...")
    mystery = "Carole Cleveland"
print("\nYour mystery Python is: ", mystery, "\n")
This one is a bit harder to test - see if you can get to every one of the Pythons.
Activity 5 - Control Structures: For loops
When we take input from the user, it is read in as a string. These are characters - so we need to convert them to actually use them as numbers. The following code demonstrates this conversion.
Type it in as num_convert.py in the Prac01
directory.
PYTHON
#
# num_convert.py: Read in number and convert to int and float
#
print('Enter a number...')
numstr = input()
print('Number =', numstr, ' Type : ', str(type(numstr)))
numint = int(numstr)
print('Number =', numint, ' Type : ', str(type(numint)))
numfloat = float(numstr)
print('Number =', numfloat, ' Type : ', str(type(numfloat)))
Notice how the first two print statements print the same number (well, it looks the same), but their variable types are different? Everything you read in will be a string. If you want a number, you’ll need to convert it with the int() or float() functions.
Testing this code will show you some easy ways to break a program. We’ll learn later how to make the code more robust (spoiler - it’s exception handling).
Now we are going to read in ten numbers and add up their total. As we
know in advance how many of numbers we want, we can use a
for loop. Type it in as num_for.py in the
Prac01 directory.
PYTHON
#
# num_for.py: Read in ten numbers and give sum of numbers
#
print('Enter ten numbers...')
total = 0

for i in range(10):
    print('Enter a number (', i, ')...')
    number = int(input())
    total = total + number
print('Total is ', total)
Save and exit the file and try running it. What are the values that variable “i” holds each time through the loop? How would you change the for loop in the program to request five numbers be entered.
These for loops will start at zero and
go up to, but not including, the stop value.
-
for i in range(10):will give usi = 0,1,2,3,4,5,6,7,8,9 -
for i in range(5):will give usi = 0,1,2,3,4 -
for i in range(1,6):will give usi = 1,2,3,4,5
Activity 6 - Control Structures: While loops
Sometimes we don’t know how many loops we want to make, but we will
know when we get there - we can test a condition (similar to an
if control structure). In this code we will enter numbers,
and type in a negative number to exit the loop. This is called a
sentinel value.
Type it in as num_while.py in the Prac01
directory.
#
# num_while.py: Read in a list of numbers (negative to exit) and
#               give the sum of the numbers
count = 0
total = 0
print("Enter a list of numbers, negative to exit...")
number = int(input())
while number >= 0:
    count += 1           # equivalent to count = count + 1
    total += number      # equivalent to total = total + number
    print("Next number...")
    number = int(input())
print("Total is ", total, " and count is ", count)
Save and exit and then run num_while.py.
Challenge
How would you need to change the while loop in the code to have it exit on zero instead of negative numbers?
while number != 0:Activity 7 - And Now For Something Completely Different
Now for a simple systems model… Unconstrained Growth and Decay.
From the “Introduction to Computational Science” text:
“Many situations exist where the rate at which an amount is changing is proportional to the amount present. Such might be the case for a population, say of people, deer, or bacteria. When money is compounded continuously, the rate of change of the amount is also proportional to the amount present. For a radioactive element, the amount of radioactivity decays at a rate proportional to the amount present.”
So, growth and decay models are common in many domains. We will implement algorithm 2 from Module 2.2 of the text book (p25). Chapter 2 is available for download at Computational Science, and provides background to these types of models.
We are going to write Python code for simulating unconstrained growth based on the following pseudocode from the text:
Algorithm 2 - simulation of unconstrained growth
- initialise simulation length
- initialise population
- initialise growth rate
- initialise (length of) time step
- number of iterations = simulation length / time step
- growth rate (per step) = growth rate * time step
- for i = 0 to number of iterations-1 do
- growth = growth rate (per step) * population
- population = population + growth
- time = i * time step
- display time, growth, population
Compare this to the following code. We are implementing the scenario which follows the Algorithm on page 25.
Enter the code as growth.py in the
And/Now/for/Something/Completely/Different directory.
PYTHON
#
# growth.py - simulation of unconstrained growth
#
print("\nSIMULATION - Unconstrained Growth\n")
length = 10
population = 100
growth_rate = 0.1
time_step = 0.5
num_iter = length / time_step
growth_step = growth_rate * time_step
print("INITIAL VALUES:\n")
print("Simulation Length (hours): ", length)
print("Initial Population: ", population)
print("Growth Rate (per hour): ", growth_rate)
print("Time Step (part hour per step): ", time_step)
print("Num iterations (sim length * time step per hour): ",
num_iter)
print("Growth step (growth rate per time step): ",
growth_step)
print("\nRESULTS:\n")
print("Time: ", 0, " \tGrowth: ", 0, " \tPopulation: ", 100)
for i in range(1, int(num_iter) + 1 ):
    growth = growth_step * population
    population = population + growth
    time = i * time_step
    print("Time: ", time, " \tGrowth: ", growth, "\tPopulation: ", population)
print("\nPROCESSING COMPLETE.\n")
Type in the code and run it.
Challenge
Can you see why the for loop was changed from 0 to
num_iter to 1 to num_iter+1?
Time step 0 is the initial step, before the loop. Our loop will go through num_iter times, starting at one. Loops usually go from 0 to maximum-1 to have maximum iterations. If we shift the start up by 1, we also have to shift the stop value by 1.
Activity 8 - Making and submitting a zip file
This Practical includes a directory structure, so we will use a recursive option on our zip command. To make a zipped file for Practical 01, go to FOP directory. Type pwd to check that you are in the right place.
Create the zip file by typing:
zip -r Prac01_<your_student_ID> Prac01

e.g. zip -r Prac01_12345678 Prac01
This will create a file Prac01_
As before, you can check (list) the contents of the zip file by typing:
unzip –l Prac01_<your_student_ID>.zipTo unzip the file, just do the above command without the
-l
Submission
All of your work for this week’s practical should be submitted via Blackboard using the Practical 01 link. This should be done as a single “zipped” file. This is the file to submit through Blackboard.
There are no direct marks for these submissions, but they may be taken into account when finalising your mark. Go to the Assessment link on Blackboard and click on Practical 0 for the submission page.
And that’s the end of Practical 01!
Key Points
- We use
input()to get the user’s input from the keyboard, andprint()to output to the screen - To choose between parts of the code to run, we can use the
if_elif_elsecontrol structure - If we want to repeat code, we can use
for loopsandwhile loops -
while loopscontinue until a condition is false - we don’t know at the start how many times they will run -
for loopsrepeat a set number of times, so we should use them when we know how many iterations we want - We can nest control strucures by indenting them inside each other
Reflection
- Knowledge: What are the three control structures we’ve learned?
- Comprehension: What is the difference between the control structures?
- Application: Give an example of where you might use each of the control structures?
- Analysis: What variable would you change in growth.py to have more iterations (steps) per hour?
- Synthesis: How would you code a for loop to print “Hello World!” 15 times?
- Evaluation: What part of the prac did you find most challenging? (You can give feedback to the lecturer/tutor…)
Challenge
For those who want to explore a bit more of the topics covered in this practical.
- Have a look at other problems from the text book: http://press.princeton.edu/titles/10291.html
- Write a similar program to whichone.py, to determine a mystery animal/sport/food
- How would growth.py change to be calculating compound interest?
Content from Prac02: Strings and Lists
Last updated on 2024-10-02 | Edit this page
Overview
Questions
- How do I work with string values and variables?
- How do I access the elements of strings and lists?
- How can I use random numbers to simulate real world situations?
Objectives
- Define and use more complex datatypes (strings and lists) and variations on control structures
- Use slicing and indexing to access elements in a list
- Use a supplied Python package to provide random number options
- Understand and implement simple Monte Carlo algorithms
Introduction
In this practical we will enter and modify programs to work with and explore strings and lists. We will then use random numbers to select list items without replacement. The final two tasks will implement two Monte Carlo algorithms: calculating Pi and tossing coins.
Activity 1 - Setting up for the practical
Login to the computers as in Practical 1. Within your home directory (/home/student_id) you should have the following structure:
FOP
 |-- Prac00
 |-- Prac01
 |-- Prac02
 |-- Prac03
 |-- Prac04
 |-- Prac05
 |-- Prac06
 |-- Prac07
 |-- Prac08
 |-- Prac09
 |-- Prac10
 |-- Prac11
Type ls FOP from your home directory to check your
directory structure.
We will be working in the Prac02 directory today. If you
do not have the directory structure correct, your tutor can help you to
rearrange it.
Copy the README file from your Prac01
directory to your Prac02 directory. Use
cp ../Prac01/README . from within the Prac02
directory, then vim README to edit. Update the
README to refer to Prac02 and include the
correct date.
Activity 2 - Everybody loves string(s)!
Strings are very important in Python and the language provides powerful options to manipulate strings. The code below shows three different approaches to printing out a string in reverse: while loops; for loops and using slicing.
Enter the following code as strings1.py…
PYTHON
#
# strings1.py: Read in a string and print it in reverse
#              using a loop and a method call

instring = input('Enter a string... ')

# *** add (2) upper and (3) duplicating code here

# reversing with a while loop
print('Reversed string is : ', end='')
index = len(instring)-1
while index > -1:
    print(instring[index], end='')
    index = index - 1
print()

# reversing with a for-range loop
print('Reversed string is : ', end='')
for index in range(len(instring)-1, -1, -1):
    print(instring[index], end='')
print()

# reversing with slicing
print('Reversed string is :', instring[::-1])
Test out the code to understand how it works. Note that in each case:
-
start value is
len(instring)-1 -
stop value is
-1 -
step value is
-1
Slicing doesn’t quite fit the pattern for start:stop:step, which would have the code as follows:
However, the -1 stop value would get interpreted as a negative index.
Python slicing is smart enough to know that when a negative step is used
(e.g. -1), the default start and stop should be switched around to the
values len(instring)-1 & -1.
Continuing on with the activity, copy strings1.py to
strings2.py and make the following changes…
- Change the start, stop and step values in each approach to print the string forwards (instead of in reverse).
- Update
instringto uppercase (so that ‘abcd’ becomes ‘ABCD’) - Update
instringto duplicate the string (ABCD becomes ABCDABCD) - Modify each of the three approaches print out every second character (ABCDABCD becomes ACAC)
- Modify each of the three approaches print out every second character, excluding the first and last (ABCDABCD becomes BDB)
Activity 3 - Variables are like Buckets…
The Bucket List is a movie from 2007 where two men work through a list of experiences they aim to have in life. This task will have you work with their bucket list.
The code below defines bucket1 directly as a list, then
appends three values. To delete a value we can use the index of the item
in the list del bucket1[6] or by value
bucket1.remove("Skydiving"). We then create a second list
bucket2 and make a new list bucket from
bucket1 + bucket2. Finally we insert a new item and print
out the buckets.
PYTHON
#
# bucket1.py - use a python list for items in a bucket list
#
print('\nBUCKET LIST\n')
bucket1 = ['Witness something truly majestic',
          'Help a complete stranger',
          'Laugh until I cry','Drive a Shelby Mustang']

bucket1.append('Kiss the most beautiful girl in the world')
bucket1.append('Get a tattoo')
bucket1.append('Skydiving')
del bucket1[5]

bucket2 = ['Visit Stonehenge',
           'Drive a motorcycle on the Great Wall of China',
           'Go on a Safari','Visit the Taj Mahal',
           'Sit on the Great Egyptian Pyramids',
           'Find the Joy in your life']

print('Bucket 1: ', bucket1)
print('Bucket 2: ', bucket2)
bucket = bucket1 + bucket2
bucket.insert(5, 'Get a tattoo')

print('\nThe bucket list is:')
print('Complete bucket list: ', bucket)

print('\nNicer formatting....\n')

for item in bucket:      # for-each loop
    print(item)          # note improved formatting
We will now create a bucket list builder to interactively create a new bucket list…
PYTHON
#
# bucket2.py - bucket list builder
#
print('\nBUCKET LIST BUILDER\n')
bucket = []
choice = input('Enter selection: e(X)it, (A)dd, (L)ist...')
while choice[0] != 'X':
    if choice[0] == 'A':
        print('Enter list item... ')
        newitem = input()
        bucket.append(newitem)
    elif choice[0] == 'L':
        for item in bucket:
            print(item)
    else:
        print('Invalid selection.')
    choice = input('Enter selection: e(X)it, (A)dd, (L)ist..')
print('\nGOODBYE!\n')
Modify the code to:
- Accept lowercase as well as uppercase letters as choices (hint: convert the inputs to upper())
- Provide an option for deleting items (hint: del bucket[int(delitem)])
Activity 4 - Assorted Creams
This program generates a list of items then prints out each selected item before deleting it. We are using a “without replacement” approach as the selected items are no longer part of the pool to be selected.
PYTHON
#
# assorted.py - selecting random biscuits from a pack
#
import random
biscuits = []
biscuits.extend(['Monte Carlo']*7)
biscuits.extend(['Shortbread Cream']*7)
biscuits.extend(['Delta Cream']*6)
biscuits.extend(['Orange Slice']*6)
biscuits.extend(['Kingston']*5)
print('\nASSORTED CREAMS\n')
print('There are ', len(biscuits), ' biscuits in the pack.')
print('\n', biscuits, '\n')
more = input('\nWould you like a biscuit (Y/N)... ')
while more != 'N':
    choice = random.randint(0,len(biscuits)-1)
    print('Your biscuit is : ', biscuits[choice])
    del biscuits[choice]
    more = input('\nWould you like a biscuit (Y/N)...')
print('\nThere are ', len(biscuits), ' biscuits left.')
print('\n', biscuits, '\n')
Challenge
Modify the code to check if the pack is empty before continuing the loop.
The condition on the while more != 'N': can be extended
to have a second condition:
while condition1 and condition2:
Check the length of the biscuit list
while more != 'N' and len(biscuits) > 0:
Activity 5 - Method of Darts
The lecture slides include code for calculating Pi using the Method of Darts.
Type the code in as darts.py and explore the accuracy
you can achieve.
Activity 6 - Tossing Coins
In this program we will toss a coin 1000 times and see how many heads or tails we count.
PYTHON
#
# cointoss.py - simulate tossing a coin multiple times
#
import random
coin = ['heads','tails']
heads = 0
tails = 0
trials = 1000
print('\nCOIN TOSS\n')
for index in range(trials):
    if random.choice(coin) == 'heads':
        heads = heads + 1
    else:
        tails = tails + 1
print('\nThere were ', heads, ' heads & ', tails, ' tails.\n')
Modify the code to ask the user to enter the number of tosses.
Activity 7 - Practice Understanding and Documenting Code
The code below is something new, and has many potential fun applications. Enter the code and add an introductory comment, and a comment on each line to describe what each part of the code is doing.
The article Overwrite Previously Printed Lines may help.
PYTHON
import time

LINE_UP = '\033[1A'
LINE_CLEAR = '\x1b[2K'
numlines = 3

eyes = ["\n< @ >  < @ >\n",
        "\n<@  >  <@  >\n",
        "\n<  @>  <  @>\n"]

for i in range(10):
    if i % 2 == 0:
        print(eyes[0])
    elif i % 4 == 1:
        print(eyes[1])
    else:
        print(eyes[2])
    time.sleep(0.5)
    for j in range(numlines):
        print(LINE_UP, end=LINE_CLEAR)
If you change a few lines, note the change to the output:
PYTHON
numlines = 4

eyes = ["\n< @ >  < @ > \n     db\n   \____/",
        "\n<@  >  <@  >\n     db\n   \____/",
        "\n<  @>  <  @>\n     db\n   \____/"]
Explore some ASCII art with this code base, e.g. a fish from the ASCII Art Archive:
Swimming left
  /
 /\/
 \/\
  \

 Swimming right
  \
 \/\
 /\/
  /
Challenge
How would you write code to animate the fish to swimming left and right, adding/removing spaces to move the fish across the screen?
PYTHON
import time
LINE_UP = '\033[1A'
LINE_CLEAR = '\x1b[2K'
numlines = 4
leftfish = ["  /", " /\\/", " \\/\\", "  \\"]
rightfish = ["  \\", " \\/\\", " /\\/", "  /"]
for s in range(10):
    for i in range(len(rightfish)):
        print(s*" ", rightfish[i])
    time.sleep(0.5)
    for j in range(numlines):
        print(LINE_UP, end=LINE_CLEAR)
for s in range(10, 0, -1):
for i in range(len(leftfish)):
print(s*" ", leftfish[i])
time.sleep(0.5)
for j in range(numlines):
print(LINE_UP, end=LINE_CLEAR)
print()Activity 8 - Scaffolded Challenge: Vending Machine
You are tasked with writing a vending machine program which keeps track of the different products (name, price and count) and dispenses the treat, if available.
We can write code to give the correct behaviour, then improve its presentation to be more interesting and engaging.
An example of the complete program is below. Making a mock-up of output is one way to specify requirements… from there, you can consider the variables and data storage required, and the program logic needed to generate that output. There is also a need for imagination - what would happen if the input was different, or if invalid input was entered?
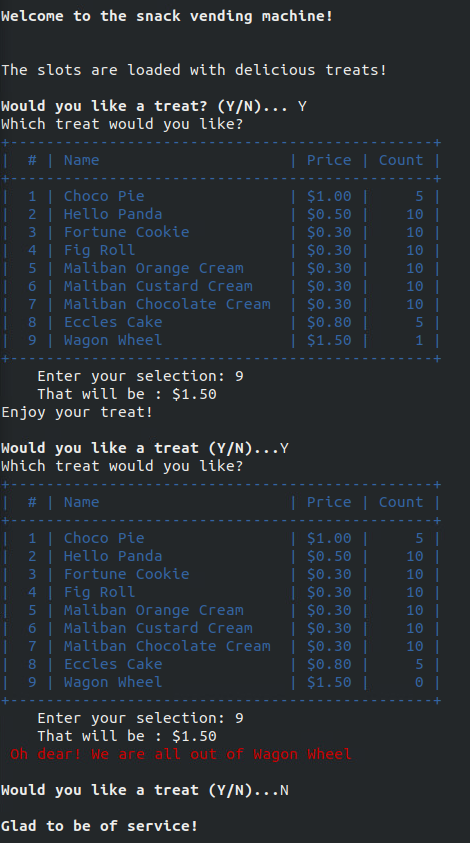
In Activity 4, we created a list of biscuits to match the contents of the Arnotts Cream Favourites and randomly chose biscuits from the pack… refer back to that for inspiration for this challenge, if needed.
What can we see in the example output:
- User is prompted for two inputs
- Y/N to choose a treat
- slot # for the treat of choice
- All treats and information is output for the user to choose between
- A count is kept for the number of each product, so you need to:
- update count for each treat selected
- give error message if there are none left of that product
- Prices are neatly formatted
- in this solution, prices are stored in cents and divided/modded by 100 for dollars and cents
-
Optional: output of products is formatted in a
table
- in this solution, it’s done with
|,-and+characters
- in this solution, it’s done with
- Optional: colour and bold are used to enhance the output (not required)
Challenge
Here are some tips to help when creating the solution
- display opening message
- set up variables to hold product list, price and count
- ask user if they want a treat
- while user reponse is not “N”
- display treats
- get user input for treat choice
- if there are none of that item
- print error message
- else
- print success message
- reduce count of that item
- ask user if they want a treat
- display closing message
There are many ways to create formatted output in Python. To stay close to what we have already learned, we will use string functions for padding out a string with blanks or zeros.
This code prints the name of the treat, left justified, to a
field-width of 23 characters. If the string is less than 23 characters
long, spaces are added to fill the rest. There is an equivalent
str.rjust(width[, pad_char]) for right-justification. the
pad_char can be a space or zeros or any other
character.
As with the LINE_UP and LINE_CLEAR codes
from earlier in the practical, we can use codes for the colours. To make
sure the colours work on all platforms, we need the following two
lines.
Some sample codes for colours, bold and underline are below. See [https://stackoverflow.com/questions/287871/how-do-i-print-colored-text-to-the-terminal] for more information.
PYTHON
# reset strings for colours

BLACK = '\033[30m'
RED = '\033[31m'
GREEN = '\033[32m'
YELLOW = '\033[33m'
BLUE = '\033[34m'
MAGENTA = '\033[35m'
CYAN = '\033[36m'
WHITE = '\033[37m'
UNDERLINE = '\033[4m'
BOLD = '\033[1m'
RESET = '\033[0m'
For example:
You should consider the background colour when choosing text colours
- yellow will show well on black, but not on white. A
`RESET at the end of each coloured string will take you
back to default colours. There are also codes for changing background
colours, which can be used for creating checkerboard and other
interesting patterns.
Submission
All of your work for this week’s practical should be submitted via Blackboard using the Practical 02 link. This should be done as a single “zipped” file. Submit the resulting file through Blackboard. (refer to Practical 00 or 01 for instructions on zipping files.
There are no direct marks for these submissions, but they may be taken into account when finalising your mark for the unit. Go to the Assessment link on Blackboard and click on Practical 02 for the submission page.
NOTE: when you leave the class you should “logout” through the menus. Do not shut down the machine!
And that’s the end of Practical 02!
Key Points
- The elements of a string are characters
- We can access characters using their index
- As we count from zero, the final element with be at length-1
- There are many functions that we can use on strings, including
upper(),lower()andcount(). See the documentation at https://docs.python.org/3.11/library/stdtypes.html#text-sequence-type-str for more details - Strings and Lists are both sequences - order is important!
- The elements of a list can be numbers, Booleans, strings or other lists
- We can have lists of lists
- As well as indexing elements, we can use
slicingto access elements using[start:stop:step]notation.
Reflection
- Knowledge: What is the difference between append and extend when working with lists? Use Google and/or the Python documentation to find the answer.
-
Comprehension: What random methods would we use to:
- generate floating point numbers?
- generate integers?
- choose between items in a list?
- Application: How would you set up assorted.py to hold values to represent a small box of Smarties? There are 24 Smarties in a box, colours are yellow, green, pink, orange, blue, red, purple and brown. Each equally likely.
-
Analysis: Why is the effect of testing against
c
hoice[0]in bucket2.py, as opposed tochoiceas a whole? -
Synthesis: How would you modify the
assorted.pycode to make it “with replacement”? - Evaluation: Which of the three approaches for reversing a string do you recommend, and why?
Challenge
For those who want to explore a bit more of the topics covered in this practical. Note that the challenges are not assessed but may form part of the prac tests or exam.
- Modify
cointoss.pyto model a six-sided dice being thrown. - Modify
assorted.pyto have the list represent a pack of playing cards (instead of biscuits). Select and print out two 5-card hands. - Modify
darts.pyto calculate the area of a triangle with coords(0,0),(1,0),(0.5,1)
Content from Prac03: Arrays and Plotting
Last updated on 2024-10-02 | Edit this page
Overview
Questions
- How do I process large amounts of data?
- What support does Python have for manipulating science and engineering datasets?
- How can I get a quick visualisation (plot) of my data?
Objectives
- Use Python arrays implemented in Numpy
- Use simple plotting techniques using matplotlib
- Apply arrays and plotting to more complex systems dynamics problems
Introduction
In this practical you will be using Numpy arrays to store data. We will then plot data from arrays and lists before using arrays and plotting in some more complex systems dynamics models.
Additional commands in VIM
VIM – additional useful commands
| Command | Description |
|---|---|
| :w | When editing a file, you can save changes so far using
:w from command mode. Press esc to go from
insert to command mode. |
| :w filename | If you want to save a file with a new name from vim command mode,
type :w new_file_name
|
| :q! | To quit without saving changes, use :q! (also good for
backing out if you accidentally put the wrong file name in,
e.g. vim grwth.py) |
| D | To delete the rest of a line (from current cursor position in
command mode), type D
|
| R | To replace the rest of a line (from current cursor position in
command mode), type R, puts you into insert mode |
| u | To undo a command or change, type u, repeat to undo
multiple |
| xG | To go to a line 20 in a file, type 20G. To go to the
last line of a file, type G
|
| A | Appends after the end of the current line, puts into insert mode |
On occasion, you may accidentally hit ctrl-z when using
vim or other programs. This pauses the program, but it is still running
in the “background”. Type fg to bring it back into the
foreground. When this happens, or if you close your machine without
saving the files, a temporary file that vim creates is left behind (when
you save and quit normally, the file is deleted). If you type
ls -la, you can see these “hidden” files – they start with
a “.”, eg. .growth.py.swp. Once you have your file back in
order, you can delete the temp files using
rm .growth.py.swp.
Activity 1 - Plotting Growth
The lectures notes gave modified code for growth.py to
plot the output. Copy growth.py from your
Prac01 directory into your Prac03 directory.
Rename it growthplot.py and update the documentation at the
start of the program. Then make the changes as indicated in the lecture
notes. This includes inserting code for importing matplotlib; creating
and appending to lists; and plotting the data.
Run the program and confirm that it plots your data.
Make the following modifications to your code (do each modification and confirm it works before moving onto the next one):
- Change the colour of the plotted line from blue to red
- Change the symbol for the plotted line to a triangle. Note that the line is formed from many individual data points, these are joined together when we use a line in our plot
- Change the simulation time from 10 hour to 100 hours, now we can see the exponential growth in the population
- Change the plotting back to a line
- Change the plot title to “Prac 3.1: Unconstrained Growth”
- Save the plot to your
Prac03directory
Activity 2 - Reading Numbers with Arrays
In Prac01 we read in ten numbers and printed their
total. Copy num_for.py from Prac01 to
Prac03/numbersarray.py. We will change this file to use
arrays to store the values and then print some summary data.
Make the changes below and run the program:
PYTHON
#
# numbersarray.py: Read ten numbers give sum, min, max & mean
#
import numpy as np

numarray = np.zeros(10)   # create an empty 10 element array

print('Enter ten numbers...')

for i in range(len(numarray)):
    print('Enter a number (', i, ')...')
    numarray[i] = int(input())

print('Total is ', numarray.sum())
Modify the code to:
- Print the min and max numbers entered
- Print the average (mean) of the numbers
- Plot the numbers
Activity 3 - Plotting Growth with Arrays
Copy growthplot.py to growtharray.py. We
will change this file to use arrays to store the values and then plot
the arrays.
- First, update the documentation accordingly.
- To use Numpy arrays, we first need to import the numpy package:
import numpy as np. Add the import line to the start of the program. - Then, create an array of zeros to hold the calculated values
- Modify the loop code to put the values into the array
- Modify the
plt.plotcall to plot the array - If you didn’t provide x-values for time (in hours), add code for x-values
Activity 4 - Plotting Subplots
Copy growtharray.py to growthsubplot.py. We
will change this program to give multiple plots in the same figure.
- Update the documentation accordingly
- Modify the plotting code to do the do the equivalent of the subplot code in the lecture slides (shown below). When adapting the code, the variable names and labels/titles will need to be changed… this is a very common task.
PYTHON
plt.subplot(211)
plt.plot(dates, march2017, '--')  # update the xvalues, yvalues and line style
plt.title('March Temperatures')   # update title
plt.ylabel('Temperature')         # update y label units

plt.subplot(212)                  # as above... for second subplot
plt.plot(dates, march2017, 'ro')  # explore different line styles
plt.ylabel('Temperature')
plt.xlabel('Date')

plt.show()                        # display plot
Save the resulting plot in your Prac03 directory.
Activity 5 - Plotting a Bar Chart
Copy numbersarray.py to numbersbar.py.
Update numbersbar.py to print a bar chart of the numbers.
In the lecture notes, we saw how to plot a bar chart from a list. We
will use similar code to plot the numbers entered into
numbersbar.py
PYTHON
plt.title('Numbers Bar Chart')
plt.xlabel('Index')
plt.ylabel('Number')
plt.bar([0, 1, 2, 3, 4, 5, 6, 7, 8, 9], numarray, 0.9, color='purple')
plt.show()
Add this code to numbersbar.py to print a purple bar
chart. Remember to import matplotlib!
Save it to your Prac03 directory.
Activity 6 - Systems Dynamics Revisited
In growth.py we implemented a simulation of
unconstrained growth. We can use the same approach to simulate decay –
using negative growth. In this example, we can look at a dosage of a
drug, e.g. Aspirin for pain and Dilantin for treating epilepsy.
Download dosage.py and save it into
your Prac03 directory. Run the program and see if you can
understand what it is doing. Look at Chapter 2 of the text for
background. The program dosage4hr.py is
a variation of dosage.py where another two tablets are
taken after 4 hours.
Next download repeatdosage.py and run it. MEC and MTC are values for effective and toxic concentrations, respectively. Note how it takes multiple doses to get up to an effective level. Download skipdosage.py and see the impact of skipped pills on the concentration.
For more background information, this exercise is based on p45-50 Chapter 2 of the Shiflet & Shiflet textbook - http://press.princeton.edu/chapters/s2_10291.pdf .
Activity 7 - Exploring Aspirin Dosages
We have seen the impact of a single dose of Aspirin, and then a
second after 4 hours. Many of these medications can have serious
imnpacts if taken regularly for too long a period. An example would be
to take the dosage4hr.py code and repeat the dosage every 4
hours… make the appropriate changes, which should give a result similar
to the plot below.
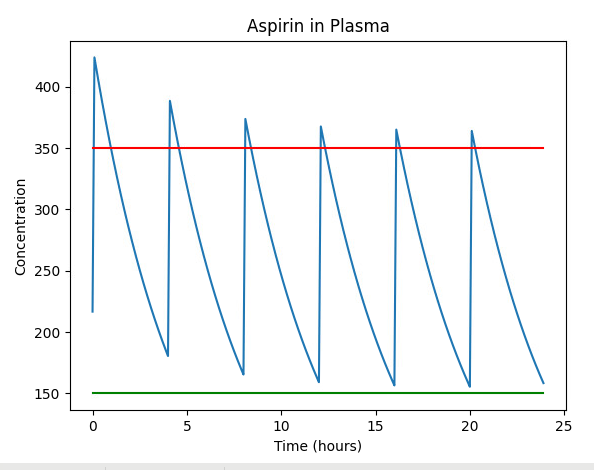
Note that the concentration of Aspirin in the blood plasma is going above the red line, which is dangerous (Mean Toxic Concentration). Also note that the blood plasma volume has/can been reduced to 2700ml, to illustrate the impact of changing these values.
Modifying this code to space the dosages further apart (6 hourly), we see the concentration is now always below the red line.
Also note that you probably have a double-dose at the start - as
shown in the sample plots. This can be corrected by setting the initial
aspirin_in_plasma value to zero (not dose).
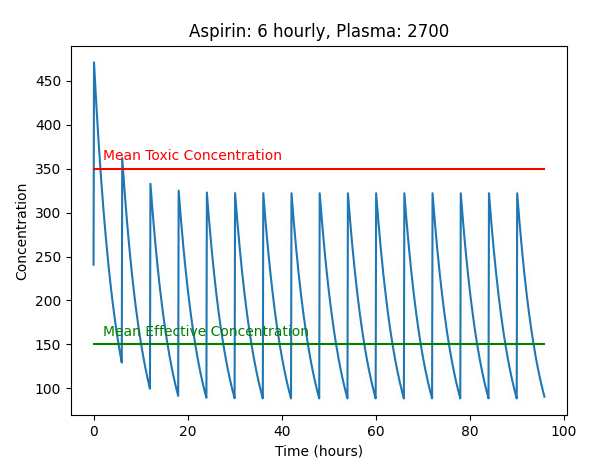
Another way to reduce the cumulative impacts of a medication is to not take it in the evening, so there might be 3 6-hourly doses and a gap overnight. This can also be an approach where a medication might keep the patient awake, or not be needed while sleeping. The next plot shows how this might impact the concentration of medication in the blood plasma.

Note that these are all models and we know that models are WRONG. There are many assumptions to consider. Blood plasma Would vary between people, and could be approximated, perhaps by weight. Drug absorption levels would vary by person, and by the contents of the stomach, or could be bypassed if the drug is given intravenously. Similarly, excretion of the drug might vary by person, and depend on their overall health.
It is a simpistic model, however, it is incredibly useful in conveying how repat doses of drug accumulate and compund.
Activity 8 - Scaffolded Challenge: Rainbows
Given we can draw a line plot in various colours, how might we plot a rainbow?
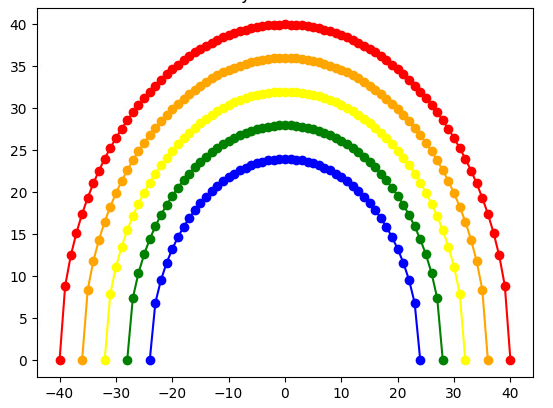
So, where might we start?
Challenge
Consider how you might generate a curve. Perhaps an upside-down parabola?
PYTHON
import matplotlib.pyplot as plt
import math

# Basic Curve
r = 5
for i in range(-r,r+1):
    plt.plot(i, r**2 - i**2,"bo")
plt.title("Basic Curve")
plt.show()
This code gives one curve of blue circles, but the shape is wrong.
A circle gives a more realistic curve… so we can use the
x**2 + y**2 = r**2 formula to find points on the edge of a
circle.
We can use the loop index to map to a particular colour, and also to change the radius of the circle.
PYTHON
import matplotlib.pyplot as plt
import math

# Many Curves 10,9,8,7,6
for r in range(10,5,-1):
    for i in range(-r,r+1):
        if r == 10:
            colour = "red"
        elif r == 9:
            colour = "orange"
        elif r == 8:
            colour = "yellow"
        elif r == 7:
            colour = "green"
        else:
            colour = "purple"
        plt.plot(i,math.sqrt(r**2 - i**2),color=colour, marker="*")
plt.title("Many Curves")
plt.show()PYTHON
# Many Curves - arrays
import numpy as np
res = 4
for r in range(10,3,-1):
    size = r * res * 2 + 1
    xarray = np.zeros(size)
    arcarray = np.zeros(size)
    if r == 10:
        colour = "red"
    elif r == 9:
        colour = "orange"
    elif r == 8:
        colour = "yellow"
    elif r == 7:
        colour = "green"
    elif r == 6:
        colour = "blue"
    elif r == 5:
        colour = "indigo"
    else:
        colour = "violet"
    for i in range(-res * r, res * r + 1):
        xarray[i] = i
        print(r, i)
        arcarray[i] = math.sqrt((res * r)**2 - i**2)
    plt.plot(xarray, arcarray, color=colour, marker="o")
plt.title("Many Curves - arrays")
plt.show()
Submission
Update the README file to include:
- growthplot.py
- numbersarray.py
- growtharray.py
- growthsubplot.py
- numbersbar.py
- dosage.py
- repeatdosage.py
- rainbows.py
along with any additional programs and charts you have created.
All of your work for this week’s practical should be submitted via Blackboard using the Practical 03 link. This should be done as a single “zipped” file. Submit the resulting file through Blackboard. (refer to Practical 00 or 01 for instructions on zipping files.
There are no direct marks for these submissions, but they may be taken into account when finalising your mark for the unit. Go to the Assessment link on Blackboard and click on Practical 03 for the submission page.
And that’s the end of Practical 03!
Key Points
- Arrays give compact storage and additional functionality when working with collections of data of the same type.
- Arrays are implemented in the
numpypackage, which youimportto be able to use them. - Plotting data aids understanding and helps us see trends.
- We can plot using
matplotlib. Other packages will be explored later in the semester
Reflection
- Knowledge: What are the names of the two Python packages we use for arrays and for plotting?
- Comprehension: What changes if we replace plt.xlabel(‘Count’) with plt.xlabel(‘Time’)
- Application: What value would you give to plt.subplot(???) to set up the 2nd plot in a 2x2 set of subplots?
- Analysis: What type of file is created when we save a plot?
- Synthesis: Each week we create a README file for the Prac. How is this file useful?
- Evaluation: Compare the use of lists and arrays in the growth*.py programs. Name two advantages of using lists, and two advantages of using arrays
Challenge
For those who want to explore a bit more of the topics covered in this practical. Note that the challenges are not assessed but may form part of the prac tests or exam.
- Modify
growthsubplot.pyto print four subplots (2x2) – the additional plots should print green squares and black triangles. (hint: subplot 1 is subplot(221)) - Modify
growthsubplot.pyto print nine subplots (3x3) – the additional plots should print green squares, black triangles, black circles, black squares, blue triangles, blue circles and blue squares. (hint: subplot 1 is subplot(331)) - Extend the aspirin simulation length in dosage4hr.py to see what happens over time with repeated dosages
- Modify dosage4hr.py to see the impact of having doses every 2 hours
Content from Prac04: 2-Dimensional Arrays, Functions and Plotting
Last updated on 2024-10-02 | Edit this page
Overview
Questions
- How can I work with data in two or more dimensions (x, y, z)?
- What are some examples of multi-dimensional data?
- How can I plot this multi-dimensional data?
- How do I make and use my own functions?
Objectives
- Understand and use multi-dimensional arrays in Python using the Numpy library
- Use sub-modules available the Scipy library
- Define and use simple functions
- Apply multi-dimensional arrays to multi-dimensional science data
- Use matplotlib to plot multi-dimensional data
Introduction
In this practical you will be exploring the use 2-D arrays. We will use the ndimage sub-module of the Scipy package. Arrays are very useful for storing the values of variables representing areas. In heat.py we will look at a model for heat diffusion. In the final two exercises, we will work with functions, firstly on strings and then on the heat diffusion calculation.
Activity 1 - Exploring 2-D Arrays
Type in the following code, zeros.py, for creating and resizing an array. Note that typing in the code helps you to learn python, whereas copying and pasting code has no learning value.
PYTHON
#
# zeros.py - creating and resizing an array
#
import numpy as np
print('\nZERO ARRAY\n')
zeroarray = np.zeros((3,3,3))

# update values here

print('Zero array size: ', np.size(zeroarray))
print('Zero array shape: ', np.shape(zeroarray), '\n')
print(zeroarray)

zeroarray.resize((1,27))
print('\nZero array size: ', np.size(zeroarray))
print('Zero array shape: ', np.shape(zeroarray), '\n')
print(zeroarray)

zeroarray.resize((3,9))
print('\nZero array size: ', np.size(zeroarray))
print('Zero array shape: ', np.shape(zeroarray), '\n')
print(zeroarray)
Modify the code to update the values. Set element
[0,0,2] to 1, element [1,1,1] to 2 and
[2,2,0] to 3. Run the code and note/understand where these
values sit in each resized array.
Activity 2 - Ndimage in Scipy
Type in the following code, prettyface.py – it’s from the lecture…
PYTHON
#
# prettyface.py
#
import matplotlib.pyplot as plt
from scipy import ndimage
from scipy import misc

face = misc.face(gray=True)
plt.imshow(face)
plt.imshow(face, cmap=plt.cm.gray)
plt.show()
Refer to the lecture slides and enter/run the code for shifting, rotating, cropping and pixelating.
Look at the documentation for colour maps and try a few of them with your code… http://matplotlib.org/examples/color/colormaps_reference.html
Activity 3 - Functions for Conversions
In this task we will create some functions to convert values between different units. To start, we will convert between Celsius, Fahrenheit and Kelvin. Below is a skeleton of how to start your code.
PYTHON
#
# conversions.py – module with functions to convert between units #
# fahr2cel : Convert from Fahrenheit to Celsius.
#
def fahr2cel(fahr):
    """Convert from Fahrenheit to Celsius. Argument:
    fahr – the temperature in Fahrenheit """
    celsius = (fahr – 32) * (5/9)
    return celsius
Note that we are using docstrings to document our functions. See the related PEP for more about docstrings - https://www.python.org/dev/peps/pep-0257/
Write some test code to test out your functions. You could start with something like the code below, or work with user input.
PYTHON
#
# testConversions.py - tests the functions in conversions.py
#
from conversions import *
print("\nTESTING CONVERSIONS\n")
testF = 100
testC = fahr2cel(testF)
print("Fahrenheit is ", testF, " Celsius is ", testC)
print()
Extend conversions.py to include all six conversion functions, along
with others you might find useful. Extend your test program to test the
other conversions. To see the docstring for a function, you access the
__doc__ attribute. So to print the docstring for fahr2cel,
you could use: print(fahr2cel.__doc__). This is how the
IDE’s access the information to give you help with usage as you type in
a function.
Activity 4 - Conversion Machine (1)
Now we can write a program, converter.py, to convert
between our temperature formats. Your program should:
- print starting message
- provide a menu of conversions to choose between
- take the user input
- while the choice is to keep going
- do the conversion, or provide an error message
- ask if they want to do another conversion
- loop back to (4)
- print closing message
This is very similar to the Bucket List Builder, so refer to Practical 02 to see that code.
Activity 5 - Conversion Machine (2)
Create a different version of the conversion machine, converter2.py, that will ask for the conversion type, then will convert a list of numbers into the target unit. The loop should exit when the user enters an empty value (just presses return).
- print starting message
- provide a menu of conversions to choose between
- take the user input
- while the choice isn’t an empty string
- do the conversion, or provide an error message
- ask if they want to do another conversion
- loop back to (4)
- print closing message
Activity 6 - Conversion Machine (3)
Think about the input you are giving to converter2.py.
Could you automate that input?
We can redirect input in the same way that we redirected the output
of history in the practical test (history > hist.txt).
Create a file temps.txt with sample input for your
converter2.py program, then try:
python3 converter2.py < temps.txtTo capture the results, you can also redirect the output:
python3 converter2.py < temps.txt > tempsout.txtMake a larger input file to see how easy it is to process data using standard in (keyboard input) and standard out (screen output).
Activity 7 - Testing your Module
In the lecture (slide 71), we saw how we can use the
__main__ attribute/variable to check if our python code has
been run directly (e.g. python3 conversions.py) or
indirectly
(e.g. from conversions import *, temp = fahr2cel(100)).
Using this, we can create test code inside our module.
Modify conversions.py to include test code by
implementing a main() function and putting the required if
statement at the end of the module. Test your changes by running the
conversions.py from the command line.
python3 conversions.py
The additional code for conversions.py is:
Activity 8 - Specifications and Pseudocode
The lecture slides included a description and pseudocode specification of a program for collecting gymnastics competition scores.
Translate the first version of the program to python (call it
competition_v1.py) and test it to check how it handles
invalid data, and the impact of the dodgy data on the results
(e.g. score of -100).
Make a copy of the code as competition_v2.py and adjust
it to match the second version of the pseudocode from the slides. Test
it again with bad input to see how it is handled.
Finally make another copy competition_v3.py and modify
it to match version three from the lecture slides. Try the same tests to
check it is working correctly.
Submission
Create a README file for Prac 04. Include the names and descriptions of all of your Python programs from this practical.
All of your work for this week’s practical should be submitted via Blackboard using the link under assessments. This should be done as a single “zipped” file. A reminder that these are not assessed, but we may look at the submission of practicals as an indicator of your engagement and effort in the unit.
And that’s the end of Practical 04!
Key Points
- Numpy provides multi-dimensional arrays in Python, along with useful functions and operations
- Indexing and slicing are used in a similar way to other sequences (1-D arrays, strings and lists)
- The Scipy library extends Numpy with more advanced functionality, including image processing. Images can be manipulated as Numpy arrays.
- We can improve readibility and reduce repetition by defining and using functions.
- Once a function has been tested - it can be used with confidence, which simplifies your code.
- Functions can be grouped into modules and imported and reused in multiple programs
Reflection
- Knowledge: What are three benefits of using functions?
-
Comprehension: What is the purpose of the
colourmap(cmap= )in Task2? - Application: How would you change the plot of the critter to be shades of purple and in reverse? (like a negative of a photo)
-
Analysis: Task 7 uses the Python variable
__name__to support testing. What does__name__equal when the module code is run directly (aspython conversions.py), and what is its value when the module is run aspython converter2.py? - Synthesis: What happens when we resize an array to be smaller than the original? What happens when we make it larger? Does the data in the array change?
- Evaluation: Compare the three versions of the competition code from task 3. How has the code improved from
- the user perspective, and
- the programmer perspective.
Challenge
For those who want to explore a bit more of the topics covered in this practical. Note that the challenges are not assessed but may form part of the prac tests or exam.
- Create a program to convert an inputted string to Pig Latin
- Find a repetitive song and use functions
e.g.
print_lyrics()to print out the complete song. Examples include:
- 10 Green Bottles
- 5 Little Ducks
- Bingo
Content from Prac05: Grids and Files
Last updated on 2024-10-02 | Edit this page
Overview
Questions
- How can we make data persistent - so that it exists before and/or after our programs run? (spoiler: it’s files)
- What are the methods/functions we need to use to work with files?
- How can list comprehensions simplify our code?
- How can we work with 2D arrays to create simulations?
Objectives
- Understand and use text files to store and load data
- Apply list comprehensions to simplify code
- Develop simple grid-based simulations using 2-dimensional arrays: fire modelling, Game of Life
- Experiment with parameters to investigate how they alter the outcomes of simulations
Introduction
In this practical you will read and write data using text files. You will also work with some grid-based algorithms – testing out different values to see how their parameters affect outcomes. We will also look at using list comprehensions to simplify our code.
Activity 1 - Reading a CSV File
Type in the following code, weather.py, for displaying the weather stored in a file:
PYTHON
#
# weather.py: Print min and max temps from a file
# (source: http://www.bom.gov.au/climate/)

import matplotlib.pyplot as plt

fileobj = open(‘marchweather.csv’, ‘r’)

# add file reading code here
line1 = ??
line2 = ??

fileobj.close()

mins = # add splitting code here, each stirng value will need to be coverted to float
maxs = # add splitting code here

dates = range(1,32)

plt.plot(dates, mins, dates, maxs)
plt.show()
Modify the code to read the data from the marchweather.csv file – available on Blackboard and here. You should download it to your Prac05 directory, look at its contents and format, then modify the code accordingly. Hint: look at split method, and list comprehensions in lecture slides.
Activity 2 - Reading another CSV file
This time, go to the Bureau of Meteorology site and download the full list of weather data for March. This time we will plot the min, max, 9am and 3pm temperatures… http://www.bom.gov.au/climate/dwo/202303/html/IDCJDW6111.202303.shtml
You can change the year and month by changing “202303” to another year+month (in two places)
Save the data by scrolling down to the “Other Formats” section and
right-clicking on the plain text version. Save it to your
Desktop or Prac05 directory as
marchweatherfull.csv. If you open it in vim you can see all
the data, but there are headers describing the data that we don’t need
to read in. Remove the header lines at the top of the file using
dd (in vim’s command mode) and then save the file. You now
have your dataset.
Write a new program, marchweather2.py to read in the
values and plot them. You will need to pick out columns from each line
you read in from the file. First split it into a list, then pick out the
values and assign them to the min, max, nine and three lists/arrays.
The code below will help start you off:
PYTHON
fileobj = open(‘marchweatherfull.csv’, ‘r’)
data = fileobj.readlines()
fileobj.close()

mins = [] # make an empty list to store the mins column on each line of the file
          # note that each entry will need to be converted to a float

# do the same for maxs, nines and threes

for line in data:
    splitline = line.split(‘,’)
    mins.append(splitline[2])
    maxs.append(splitline[3])
    nines.append(splitline[10])
    threes.append(splitline[16])
Then add a plt.plot() call to plot lines for mins, maxs,
nines and threes. Make sure you set up the x values (dates) as in
Activity 1.
Activity 3 - Writing to a CSV file
Take your marchweather2.py and modify it to write the
four lists of values into a csv file, four values per line. You may have
to convert them to strings when building each line to write.
Activity 4 - List comprehensions
Using list comprehensions can reduce and simplify your code. In the lecture, we saw some examples of using list comprehensions. Using the lecture slides as a guide, write code to do the following using both loops and list comprehensions for each:
- Make a list
numberswith the numbers from 1 to 5 - Write a function
triple(n)and use it to triple each number in numbers - Write code to read in a string and extract all of the numbers (Hint:
isdigit()) - Write code to capitalise the first letter of each word in a list of words (Hint:you can use use “+” to put the word back together)
You may find places in the previous activities where list comprehensions could have been used.
Activity 5 - Heat Diffusion
Download and run heat.py, available in the practical
area on Blackboard and here. There have been
some changes made over time to improve readability
PYTHON
import numpy as np
import matplotlib.pyplot as plt

size = 20

currg = np.zeros((size,size))
print(currg)
for i in range(size):
    currg[i,0] = 10

nextg = np.zeros((size,size))

for timestep in range(5):
    for r in range(1, size-1):
        for c in range (1, size-1 ):
            ### HIGHLIGHTED CODE
            nextg[r,c] = (currg[r-1,c-1]*0.1 + currg[r-1,c]*0.1
                         + currg[r-1,c+1]*0.1 + currg[r,c-1]*0.1
                         + currg[r,c]*0.2 + currg[r,c+1]*0.1
                         + currg[r+1,c-1]*0.1 + currg[r+1,c]*0.1
                         + currg[r+1,c+1]*0.1)
            ### HIGHLIGHTED CODE
    for i in range(size):
        nextg[i,0] = 10

    print("Time step: ", timestep)
    print(nextg)
    currg = nextg.copy()

plt.imshow(currg, cmap=plt.cm.hot)
plt.show()
Make the following modifications to the code. The first improves readability, the second gives the user more information about the progression of the heat diffusion. Make sure you understand what the code does. Re-run the program after each change to see that it still works.
- Modify the program to replace the highlighted code with the more
readable code below:
nextg[r,c] = 0.1 * (currg[r-1:r+2,c-1:c+2].sum() + currg[r,c]) - Modify the code to plot the current grid at the end of each timestep
Activity 6 - Heat Diffusion with Functions
Our heat.py program has an ugly line of code to
calculate the next values for each cell - TMI (too much information). We
modified it in the previous activity to have cleaner code, but can make
the code even more readable by hiding these ugly details in a
function.
Copy heat.py to heatfun.py and create a
function calcheat(subarray) to factor this calculation out.
You can then call the function as:
The lines to put in the function is:
This apporach passes only the 3x3 subgrid of the
array into the function - protecting the rest of the array from
accidental changes. We also return the result - making it
clearer what changes are happening to the array.
Activity 7 - Reading (yet another) CSV file
Copy your heat.py and call the copy
heatsource.py. This time we are going to read a heat source
in from a file.
Create a file heatsource.csv to hold the heatsource:
(note, you can copy a line using yy and p
in vim - yank and paste)
10,0,0,0,0,0,0,0,0,0
10,0,0,0,0,0,0,0,0,0
10,0,0,0,0,0,0,0,0,0
10,0,0,0,0,0,0,0,0,0
10,0,0,0,0,0,0,0,0,0
10,0,0,0,0,0,0,0,0,0
10,0,0,0,0,0,0,0,0,0
10,0,0,0,0,0,0,0,0,0
10,0,0,0,0,0,0,0,0,0
10,0,0,0,0,0,0,0,0,0
In our original program we had two loops to set up and maintain the heat source:
for i in range (size):
    currg[i,0]=10
This could also have been done in a more Pythonic way with:
currg[:,0] = 10We are going to replace those lines with code to read the heat source from our file and update in each loop from our new h array to maintain the heat source.
Replace the first heat source code instance with the following to read data from a file:
PYTHON
# create heat source
hlist = []
fileobj = open('heatsource.csv','r')
for line in fileobj:
    line_s = line.strip()
    ints = [float(x) for x in line_s.split(',')] # list comprehension
    hlist.append(ints)
fileobj.close()

harray = np.array(hlist) # heat source array to maintain the heat generation in the simulation
currg = harray.copy()
And in the loop the heat source needs to be updated using the new h array…
PYTHON
# Calculate heat diffusion
for timestep in range(100):
    for r in range(1,size-1):
        for c in range (1, size-1):
            nextg[r,c]=calcheat(curr[r-1:r+2,c-1:c+2]) # heat diffusion

    for r in range(size):
        for c in range(size):
            if harray[r,c] > nextg[r,c]:  # maintaining heat source
                nextg[r,c] = harray[r,c]

    currg = nextg.copy()
Your code should now output the same information as it did before – test it and see.
In a similar way to list comprehensions, we can simplify the four
lines of code above to one line using
np.where(harray > nextg, harray, nextg). This will
overwrite values in nextg where the value in harray is larger:
Copy heatsource.csv to heatsource2.csv,
change the values in heatsource2.csv, and make the
necessary changes to heatsource.py to see how it changes
the output of the program.
Activity 8 - Fireplan
Access the Interactivate app at: http://www.shodor.org/interactivate/activities/FireAssessment/
Explore the use of the app and how it is making use of the grid and neighbours. Also look at the use of graphics to represent the different states of a cell. What different graphics are used for the states and what do they represent?
Activity 9 - Game of Life
Have a read of https://web.stanford.edu/class/sts129/Alife/html/Life.htm (a very old-school web page!) to see how the Game of Life works.
Use your mouse to enter some life into the Game of Life Simulator https://playgameoflife.com/ , then click run to see the outcomes. How long does your population survive? Try some of the shapes from the Stanford website to see how they behave.
We won’t be implementing the Game of Life algorithm, but you could try writing some pseudocode for how you might approach it, or look online for some descriptions of algorithms.
Submission
Update the README file to include all files created in this practical.
All of your work for this week’s practical should be submitted via Blackboard using the Practical 05 link. This should be done as a single “zipped” file. Submit the resulting file through Blackboard. (refer to Practical 00 or 01 for instructions on zipping files.
There are no direct marks for these submissions, but they may be taken into account when finalising your mark for the unit. Go to the Assessment link on Blackboard and click on Practical 05 for the submission page.
And that’s the end of Practical 05!
Key Points
- Files can provide persistent data that exists before and/or after our programs run? These files can also be used for sharing information, and allow more complex problems
- We need to open files to have an object to represent the state of the files, and let us access input/output (I/O) functions. Files should be closed when we’ve finished reading/writing data.
- Text files are strings, with three read functions - read(), readline(), readlines() and one write function - write()
- See https://docs.python.org/3/tutorial/inputoutput.html#reading-and-writing-files for more about files
- We can reduce the number of lines of code using list comprehensions - creating a new list from an
- existing list/sequence + transformation + conditions.
- Gridding algorithms allow us to use 2D+ arrays to create simulations - we just need to define how to calculate the next value in each cell on each timestep
Reflection
- Knowledge: What are the three different read methods we can use on a file? What is the difference between them?
- Comprehension: What does the line file2.write(…) do in Activity 4?
-
Application: Given the Game of Life rules, what
would happen to the centre cell in the following cases:
-
Analysis: What variation of “neighbours” does
heatsource.pyuse? How would the code change if it were to use the other neighbour approach? - Synthesis: How would you create a heat source input file with a 4x4 heat source in the centre of the 10x10 grid?
-
Evaluation: Name two advantages to reading initial
data from a file as in the updated
heatsource.py.
Challenge
For those who want to explore a bit more of the topics covered in this practical. Note that the challenges are not assessed but may form part of the prac tests or exam.
- Follow the workflow from Activity 3 to process and plot February weather data.
- For students based in Australia, find another country’s weather data sharing site, or an international one
- If you are not in Australia, see if you can find you local government’s weather data sharing site.
- Find and download some Game of Life* code and get it running.
Content from Prac06: Modelling the World with Objects
Last updated on 2024-10-02 | Edit this page
Overview
Questions
- How can we set up classes to represent real-world objects?
- How do we write methods to communicate with our objects?
- How can our code help to maintain a valid state in the object?
Objectives
- Understand the main concepts in object- oriented programming and their value
- Read and explain object-oriented code
- Apply and create simple object-oriented Python code
Introduction
In this practical you will write Python programs to implement the objects used as examples in the lecture. We will see how to create and manipulate objects, and how to group them in useful ways.
Activity 1 - Animals as Objects
We will keep our class definitions in separate python files. In your
Practical 6 directory, edit animals.py with vim. Enter the
class definition for Cat into animals.py.
If you try to run animals.py, what happens?
We need a driver program to test out our Cat class. Edit
testCat.py and enter the following code:
PYTHON
from animals import Cat

garfield = Cat(‘Garfield’, ‘1/1/1978’, ‘Orange’, ‘Tabby’)

garfield.printit()

print(garfield)
Note the difference in the output of garfield.printit()
and print(garfield).
Activity 2. More Animals!
Edit animals.py and add in the class definitions for Dog and Bird. Create some test data and code in testAnimals.py to test all three classes. Use testCat.py and the lecture notes as a starting point.
Activity 3 - Even more animals!
Following the general outline for our programs, we will now create a program to read in animals from a file into a list of animal objects. The file will hold comma-separated values. Our algorithm will be:
- Openfile
- Read data from file into animal list
- Print animal list using printit() method
More detail of what we will need in our code is:
- Import classes
- Create variables
- Open file
- For each line in the file
- Create animal object using class matching first field in the entry
- Add it to the animal list
- Print animal list
Have a look at animals.csv (below) to see how you can
read in the file.
Dog,Dude,1/1/2011,Brown,Jack Russell
Cat,Oogie,1/1/2006,Grey,Fluffy
Bird,Big Bird,10/11/1969,Yellow,Canary
Cat,Garfield,1/1/1978,Orange,Tabby
Work through each part of the algorithm and test it out before moving on to the next step.
Extend the animals.csv file to include animals of your
choice, then re-run your code.
Activity 4 - Building bank accounts
Type in the code from Version 3 of the Bank Accounts example in the
lecture slides. The class definitions should be in
accounts.py and the driver code in
testAccounts.py. Test (run) the code to see that it works
as shown in the lecture.
Activity 5 - Simulating bank account transactions
We are going write some new code banking.py to allow the
user to choose a transaction, account and optional amount to run
transactions on one account. This will be in a loop that also allows for
printing all the current balance. We are working towards something
similar to the bucketlist builder…
- Import classes
- Create variables
- build bank account object
(‘Everyday’,‘007’,3000) - Request transaction selection:
withdrawal, deposit, interest, balance or exit. e.g. W for Withdrawal, D for deposit, I for interest, B for balance and X for eXit - While exit is not selected
- If ‘W’ – ask for amount then call withdraw method
- Else if ‘D’ – ask for amount then call deposit method
- Else if ‘I’ – call interest method
- Else if ‘B’ – print balance
- Request transaction selection
Activity 6 - Improving bank account code
The code for requesting the transaction selection is quite
cumbersome. Copy banking.py to banking2.py and
add a new function: chooseTrans() which will:
- Prompt for the transaction selection
- Check that it is valid (while not valid, ask again)
- Return the choice
Update banking2.py to use the function in
both places it is required.
Submission
Update the README file to include all files created in this practical.
All of your work for this week’s practical should be submitted via Blackboard using the Practical 06 link. This should be done as a single “zipped” file. Submit the resulting file through Blackboard. (refer to Practical 00 or 01 for instructions on zipping files.
There are no direct marks for these submissions, but they may be taken into account when finalising your mark for the unit. Go to the Assessment link on Blackboard and click on Practical 03 for the submission page.
And that’s the end of Practical 06!
Key Points
- We can model real world items as objects
- The template for an object is its class - which we can use to make lots of objects
- Objects know their state (data) and behaviour (methods) and are responsible for choosing who can access their data, and how… we can trust them to maintain a valid state
- The convention is to use a capital letter for the class name, and lowercase for variables (which can hold objects)
- If we create a dog object
d1 = Dog("Brutus"), we call its methods asd1.sit()and can access data asd1.nameor through a method e.g.d1.getName(). Accessing the data directly is often easier, but can be risky…- Could alter data and make it invalid
- Requires knowledge of the internal workings of the object - which is against OO principles
Reflection
- Knowledge: What is the difference between a class and an object?
- Comprehension: What is the difference in the code used to define a class, and the code used to define an object?
- Application: How would you write a new class to represent a rabbit?
-
Analysis: What is the difference between
garfield.printit()andprint(garfield)? Which would you use and why? -
Synthesis: How would you modify the pet classes in
animals.pyto include a microchip number for cats and dogs? - Evaluation: Task 5 takes in user input to determine the transactions and amounts if required. What parts of this should have validation to make the code more robust? (less likely to crash if given the wrong input)
Challenge
For those who want to explore a bit more of the topics covered in this practical. Note that the challenges are not assessed but may form part of the prac tests or exam.
- Add class variables and methods to
Dog, Cat and Birdto represent how they move (self.moves), and togetMoves(). These will be class variables as they will apply to all objects of that class. - Extend
banking.pyto have three bankaccounts in a list. Modify your code to ask for the account for each transaction
Content from Prac07: Object Relationships and Exception Handling
Last updated on 2024-10-02 | Edit this page
Overview
Questions
- How can we work with collections of objects?
- How can we make use of common state and behaviour to organise objects using a hierarchy of classes?
- Where can we use exceptions to make our code more robust?
Objectives
- Understand and apply class relationships: composition, aggregation and inheritance
- Understand and use exception handling
Introduction
In this practical we will see how to create relationships between objects. Exceptions are an important concept in OO programming. We will add exceptions to our code.
Activity 1 - Setting up an animal shelter
The lecture notes outline an implementation of an animal shelter class. This class includes lists of animals – which is an aggregation relationship. The shelter “has” animals.
Type in the code below as shelters.py and copy and
modify animals.py from Practical 6 as shown in the next
code snippet. These match the code given in the Lecture 7 slides.
shelters.py
PYTHON
from animals import Dog, Cat, Bird, Shelter

print('\n#### Pet shelter program ####\n')

rspca = Shelter('RSPCA', 'Serpentine Meander', '9266000')

rspca.newAnimal('Dog', 'Dude', '1/1/2011', 'Brown', 'Jack Russell')
rspca.newAnimal('Dog', 'Brutus', '1/1/1982', 'Brown', 'Rhodesian Ridgeback')
rspca.newAnimal('Cat', 'Oogie', '1/1/2006', 'Grey', 'Fluffy')
rspca.newAnimal('Bird', 'Big Bird', '10/11/1969', 'Yellow', 'Canary')
rspca.newAnimal('Bird', 'Dead Parrot', '1/1/2011', 'Dead', 'Parrot')

print('\nAnimals added\n')

print('Listing animals for processing...\n')

rspca.displayProcessing()

# This code is commented out until you have implemented
# the methods in animal.py
#print('Processing animals...\n')
#rspca.makeAvailable('Dude')
#rspca.makeAvailable('Oogie')
#rspca.makeAvailable('Big Bird')
#rspca.makeAdopted('Oogie')
#print('\nPrinting updated list...\n')
#rspca.displayAll()
animals.py
PYTHON
# Cat, Dog, Bird definitions from Prac 7 should be here
class Shelter():
    def __init__(self, name, address, phone):
        self.name = name
        self.address = address
        self.phone = phone
        self.processing = []
        self.available = []
        self.adopted = []

    def displayProcessing(self):
        print('Current processing list:')
        for a in self.processing:
            a.printit()
        print()

    def displayAvailable(self):
        ... # add your code here

    def displayAdopted(self):
        ... # add your code here

    def displayAll(self):
        self.displayProcessing()
        #self.displayAvailable()
        #self.displayAdopted()

    def newAnimal(self, type, name, dob, colour, breed):
        temp = None
        if type == 'Dog':
            temp = Dog(name, dob, colour, breed)
        elif type == 'Cat':
            temp = Cat(name, dob, colour, breed)
        elif type == 'Bird':
            temp = Bird(name, dob, colour, breed)
        else:
            print('Error, unknown animal type: ', type)
        if temp:
            self.processing.append(temp)
            print('Added ', name, ' to processing list')

    def makeAvailable(self, name):
        ... # add your code here

    def makeAdopted(self, name):
        ... # add your code here
Activity 2 - It’s a family affair
In the lecture we created a parent (super) class Animal
to factor out the repetition in Cat, Dog and Bird. This is
an inheritance relationship – Cat “is an”
Animal. Edit animals.py and add in the
modified class definitions for Dog and Bird.
Re-run shelters.py after making the changes to see that
everything still works.
PYTHON
class Animal():
    myclass = "Animal"

    def __init__(self, name, dob, colour, breed):
        self.name = name
        self.dob = dob
        self.colour = colour
        self.breed = breed

    def __str__(self):
        return(self.name + '|' + self.dob + '|' + self.colour + '|' + self.breed)

    def printit(self):
        spacing = 5 - len(self.myclass)
        print(self.myclass.upper(), spacing*' ' + ': ', self.name,'\tDOB: ',
                self.dob,'\tColour: ', self.colour,'\tBreed: ', self.breed)

class Dog(Animal):
    myclass = "Dog"

class Cat(Animal):
    myclass = "Cat"

class Bird(Animal):
    myclass = "Bird"
Activity 3 - People are People
In the lecture we saw the above class diagram for people, students and staff. We will now implement that structure and then read information from files using regular expressions to split out the data.
people.py
PYTHON
class Address():
    def __init__(self, number, street, suburb, postcode):
        self.number = number
        self.street = street
        self.suburb = suburb
        self.postcode = postcode

    def __str__(self):
        return(self.number + ' ' + self.street + ', ' + self.suburb + ', ' + self.postcode)

class Person():
    def __init__(self, name, dob, address):
        self.name = name
        self.dob = dob
        self.address = address

    def displayPerson(self):
        print('Name: ', self.name, '\tDOB: ', self.dob)
        print(' Address: ', str(self.address))
testPeople.py
PYTHON
from people import Address, Person
print('#### People Test Program ###')
testAdd = Address('10', 'Downing St', 'Carlisle', '6101')
testPerson = Person('Winston Churchill', '30/11/1874', testAdd)
testPerson.displayPerson()
Run testPeople.py to see its output. Add in another test
person and re-run the program.
Now we can add in a sub-class for Staff. We don’t want to duplicate
code, so, where possible, we will use super() to call the
methods from the parent class. Modify people.py and
testPeople.py to include the code below.
testPeople.py
PYTHON
from people import Address, Person, Staff

print('#### People Test Program ###')
testAdd = Address('10', 'Downing St', 'Carlisle', '6101')
testPerson = Person('Winston Churchill', '30/11/1874', testAdd)
testPerson.displayPerson()
print()
testAdd2 = Address('1', 'Infinite Loop', 'Hillarys', '6025')
testPerson2 = Staff('Professor Awesome', '1/6/61', testAdd2, '12345J')
testPerson2.displayPerson()
print()
people.py
Activity 4 - Shower the People
So, we have People and Staff classes. We can follow the same pattern
to create students, postgrad students and undergrad students: (update
people.py)
- Student class
- extend Person
- add a Student ID instance variable
- update the myclass class variable to be ‘Student’
- Postgrad class
- extend Student
- Undergrad class
- extend Student
- update the myclass class variable to be ‘Undergrad’
Update testPeople.py to include values to test the new
classes.
Activity 5 - Universal People Reader
Now we can connect up some concepts from across the semester to load up a list of people. We will read in people data from a file, split it by a delimiter (‘:’), extract fields create objects and add them into the list.
What we will need in our code is:
- Import classes
- Create variables (e.g. empty list for the people)
- Open file
- For each line in the file
- Split line into class, name, dob, address
- Create person object to match first field in the entry
- Add the new person to the list
- Print person list
Here is the sample file – you can copy and paste it into vim:
people.csv
people.csv
Staff:Professor Michael Palin:1/6/61:1 Infinity Loop, Balga, 6061:5555J
Postgrad:John Cleese:1/9/91:16 Serpentine Meander, Gosnells, 6110:155555
Undergrad:Graham Chapman:7/9/97:80 Anaconda Drive, Gosnells, 6110:166666
Undergrad:Connie Booth:8/9/98:10a Cobra St, Dubbo, 2830:177777
We can split the input on ‘:’ to separate the class, name, dob, address and ID.
Activity 6 - Exceptional People Reader
As a final part to this practical, we can add exception handling to our program. One of the riskiest areas of code is working with files. We can update the code from Task 5 to add exception handling around the file open/read/close. We should always have exception handling around file input and output.
try:
    with open('people.csv', 'r') as f:
        lines = f.readlines()
except OSError as err:
    print('Error with file open: ', err)
except:
    print('Unexpected error: ', err)
Change the code to request the file name from the user, then test what happens if the file does/does not exist. Put this code into a loop to keep requesting the filename until it is entered correctly.
Activity 7: - Extra-exceptional People Reader
Change the code from Activity 6 to raise an invalid value error when the date of birth is invalid (there are many ways for it to be invalid - choose one). This should be be chacked in the init function of the Person class. You will then need to put try/catch around the creation of the objects. Print a message to show the user which record(s) are incorrect.
Create a new input file to test this functionality.
Imagine if this was a very large input file… just printing to the
screen for each error could give a large and confusing output. Update
your code to write to a file
errorLog.txt each time an error occurs from reading in the
data and creating objects.
Submission
Create a README file for Practical 7. Include the names and descriptions of all of your files from today.
All of your work for this week’s practical should be submitted via Blackboard using the link in the Week 7 unit materials. This should be done as a single “zipped” file.
And that’s the end of Practical 07!
Key Points
- Classes are templates for creating objects
- We can define classes to have objects contain other objects or inherit from a class heirarchy
- We should define methods to allow communication with objects, and may have multiple levels of methods to work with collections and/or inheritance
- Exception handling helps us make our code more robust by adding exception handling where errors might occur.
Reflection
- Knowledge: Define class variables and instance variables - how are they different? (note that we use specific meanings for them in this unit, they are often considered synonyms)
-
Comprehension: If a class variable is changed,
e.g.
BankAccount.interest_rate = 0.02inaccounts.py, which objects are affected? -
Application: How would you setup multiple shelters
in
shelters.py? -
Analysis: In Task 2 the method
__str__was added to theAnimalclass. What does it do and how does it improve the classes?
-
Synthesis: Describe what could you do to make your
code more robust? (Hint: testing and exceptions)
- Evaluation: Two approaches to checking for errors when converting a string to an integer are: to check formatting before trying a risky function; or to check for exceptions. Why would the latter be preferred?
Challenge
For those who want to explore a bit more of the topics covered in this practical. Note that the challenges are not assessed but may form part of the prac tests or exam.
- Extending Activity 5, add phone numbers to the input file
people.csv, then add in code to read in the phone numbers.
- Add exception handling to the accounts programs from last week. Each
numeric input should be protected and checked with try/except
clauses.
- Extending Activity 2, add in a class to represent rabbits and then
write code to test it.
- Extending Activity 2, add an instance variable for holding the microchip information for cats and dogs in the animal shelter example. Birds do not have microchips, so it shouldn’t be in (or inherited into) their class definition.
Content from Prac08: Scripts and Automation
Last updated on 2024-10-23 | Edit this page
Overview
Questions
- Newly updated, check the old prac sheet if you find problems
Objectives
- Understand and use Bash and Python as a scripting languages
- Apply Python scripts to implement a parameter sweep using an existing program
- Understand and modify supplied code to automate experiments
Introduction
In this practical you will be writing Bash and Python scripts to automate the process of running experiments. We will start with some simple bash examples, then you will download and modify code, and write scripts to run the programs multiple times with different parameters.
Activity 1 - The Power of Unix
Each week we have be creating a README file to describe the programs we have written for each practical. So far that’s five READMEs in different directories. It might be interesting to list the programs and their descriptions.
Begin by creating the directory for Prac6 and changing to that
directory. We can start with listing the contents of all our
Prac* directories. That’s a level above where we are, so we
need to use ../ .
Try the following commands…
ls ../Prac*
ls –R ../Prac*
ls –l ../Prac*/*.py
ls –l ../Prac*/README*
What is the difference between the various commands?
If we want to pull information out of a file, we can use grep. Grep matches to the strings within each line of the file, and prints the ones that match.
grep .py ../Prac*/README*
grep .py ../Prac*/README* | wc
grep .py ../Prac*/README* | wc -l
grep .py ../Prac*/README* > myprogs.txt
Try to work these out:
- Find out which programs use matplotlib.pyplot using a grep command.
- Calculate how many print statements are in each program (grep & wc).
Activity 2 - Using command line arguments
In most of our programs, we have hard-coded the values into the variables. That means we have to edit the code to change and experiment with the variables. We may have a few variables we want to work without creating new versions of our program each time. We implement this through command line arguments or input files (as in heatsource.py). In this task we will use command line arguments.
Download repeatdosageP.py from Blackboard. It is a
modified version of our previous program – providing more information
about parameters and results. If you look at the min, max and mean
values at the end of the program – there are two versions. As what we
are really interested in with this experiment is the
drug_in_system being between the MEC and
MTC – a simple minimum and mean don’t really help us. The
code gives a simple approach to checking when the value first goes above
MEC, and calculates the min, max and mean after that. Run
the code to confirm what it does.
We will make a new version of the program, dosagebase.py
to use command line arguments. Make the following changes at the start
of the program:
PYTHON
import sys
# Process command line arguments

if (len(sys.argv) < 3):
    print('argv too short, usage: python3 <interval> <dosage>')
    print('Using default values for interval (8) and dosage (100)')
    Vinterval = 8 # 8 hours between doses
    Vdosage = 100 # dosage 100mg
else:
    Vinterval = int(sys.argv[1]) # hours between doses
    Vdosage = int(sys.argv[2]) # dosage
Then change the setup of the interval and dosage variables to use Vinterval and Vdosage. Test the program to see that it works. See how the output changes for different dosage and interval values.
Another change we might want is to stop the program plotting to the screen. We can save the plot to a file instead.
Now our program is ready to be the base program for a parameter sweep. We’ll create the parameter sweep program in the next task.
Activity 3 - Run a parameter sweep
Our base program takes two command line variables: interval and dosage. We want to be able to sweep across a range of values for these two variables, to find workable ways to prescribe the medication. Of course, we could consider changing other variables – but we’ll stick to two for now.
A bit like our range statements in Python, we’d like to be able to
have a start, stop and step value, for each variable. Thus our script
will take six command line arguments:
low_int high_int step_int low_dose hi_dose step_dose
The driver script, dosage_sweep.sh, below, creates a
directory for the experiment, processes the command line arguments and
then has two for loops to go through the parameter sweep. Inside the
loop it calls the dosagebase.py program and redirects the output to a
file. Type in the driver script and see if you can get it working.
#!/bin/bash

exp_dir=dosage`date "+%Y-%m-%d_%H:%M:%S"`

mkdir $exp_dir
cp dosagebase.py $exp_dir
cp dosage_sweep.sh $exp_dir
cd $exp_dir

low_int=$1
hi_int=$2
step_int=$3
low_dose=$4
hi_dose=$5
step_dose=$6

echo "Parameters are: "
echo "Interval : " $low_int $hi_int $step_int
echo "Dosage : " $low_dose $hi_dose $step_dose

for i in `seq $low_int $step_int $hi_int`;
do
    for d in `seq $low_dose $step_dose $hi_dose`;
    do
        echo "Experiment: " $i $d
        outfile="dosage_I"$i"_D"$d".txt"
        python3 dosagebase.py $i $d > $outfile
    done
done
If you look in the directory after the script has run, you will see
the saved png plots and the txt files. You can look at the results
using: tail –n 3 *.txt
Run the script with the following values:
sh dosage_sweep.sh 4 12 4 50 300 50Can you find the extreme results using tail? Look at the graphs to confirm the data.
Activity 4 - Automatic weather plots
In the lecture we looked at a workflow for plotting data. The steps were:
- Get data: wget
- Extract lines: grep
- Extract columns: awk
- Plot: gnuplot
Type in the commands from the lecture on the command line to ensure
they work. You may need to add a –p to gnuplot to make the
plot stay on the screen:
gnuplot –p plotcmd.txtAlso, downloading from the BOM website may be blocked. This command will pretend to be a web browser and should work:
wget --user-agent="Mozilla" http://www.bom.gov.au/climate/dwo/202402/text/IDCJDW6111.202402.csvUse the history command and redirection to put the workflow commands
into a file weather_workflow.sh
history 20 > weather_workflow.shAdd #!/bin/bash as the first line of the file – this
specifies the shell to use to run the program. Delete
unnecessary lines (dd), remove numbers from the start of liens and make
any other changes you need, then you should be able to run the code
with:
sh weather_workflow.shOnce you have this working, add code to the script to
- Put command line arguments in to take in the year and month
- Make a directory based on the year and month: plot_year_month
- Copy the script and plotcmd.txt file into the directory
- Change to the directory
- Download the data – substituting the year and month into the URL
- Extract the lines
- Extract the columns
- Plot the data
If you want to plot to a file, you need to set the terminal and output file name. See the example below:
gnuplot -e "set terminal png size 400,300; set output 'xyz.png'; plot [-4:4] exp(-x**2 / 2)"All the plotting commands can be typed in, or put into a file and referred to.
Submission
Update the README file to include all files created in this practical.
All of your work for this week’s practical should be submitted via Blackboard using the Practical 08 link. This should be done as a single “zipped” file. Submit the resulting file through Blackboard. (refer to Practical 00 or 01 for instructions on zipping files.
There are no direct marks for these submissions, but they may be taken into account when finalising your mark for the unit. Go to the Assessment link on Blackboard and click on Practical 08 for the submission page.
And that’s the end of Practical 08!
Key Points
- Our python programs so far have been applications working on data files
- With scripting, we can also work with the operating system to create and move files, navigate the filesystem (ls, cd, mkdir etc.)
- Using command line arguments lets us change parameters into a script/program - a bit like arguments into a function
- Command line arguments help us make flexible code, avoiding entering data at prompts or editing files directly - both of which cna introduce errors
- Using Unix utilities and our own programs as reusable steps in a workflow makes it possible to automate our processing
Reflection
- Knowledge: Python has a number of ways to work with the operating system, including the sys, os and shutil packages. Give a quick summary of what is in each packge.
- Comprehension: What benefits are there to using command line arguments?
- Application: Scenario: A (this) unit has a hurdle of 40% on the exam - i.e. you need 40% on the exam to pass the unit. If you had all student marks for a semester, how might you use a parameter sweep to explore the pass rate for differnt hurdle percentages?
- Analysis: What are the similarities and differences between command line argument usage/mechanism in bash scripts and Python scripts?
- Synthesis: How would you create a parameter sweep with three variables to explore? How would you calculate how many times the experiment will run? (innermost loop)
- Evaluation: What are the advantages/disadvantages to having separate base and driver code in a parameter sweep? Why don’t we just bundle it all together?
Challenge
For those who want to explore a bit more of the topics covered in this practical. Note that the challenges are not assessed but may form part of the prac tests or exam.
- To read about a science project with data processing pipelines, view the Fireballs in the Sky guest lecture notes and have a look at their website http://fireballsinthesky.com.au/
- Another version of the drug dosage program is available on blackboard. Download and run it. Consider the differences in implementation. What benefits are there in the alternative approach?
Content from Prac09: Quality and Testing
Last updated on 2024-10-26 | Edit this page
Overview
Questions
- Why should we care about code quality?
- How can we improve code quality?
- What tools are available to assist with creating and assessing code?
Objectives
- Understand the need for quality in software, how to assess it and how to achieve it
- Have an awareness of formal approaches to managing and specifying projects
- Understand the value of version control in software projects
- Access and assess packages in the Python Package Index
- Understand the basics of software testing and its importance
Introduction
We will go through a short programming challenge to see how we develop code with high quality, and use testing to show that it meets our requirements - for valid and invalid inputs.
The coding probelm we will use was a Practical Test 1 in a previous semester.
PYTHON
myname = "Tim the Enchanter"
myyear = 898

print(f"Hello, my name is {myname}.")

for i in range(myyear//100):
    if i % 10 == 0:
        print("*", end="")
print()
Modify the code in PracTest1.py to:
- Correct any errors - get the given code working (errors have already been removed)
- Change myname and myyear to be your details
- Add code to ask the user their name and year of birth
- In an appropriate loop, test that the year is valid, ask them to re-enter the year and continue looping until it is valid
- Based on the difference between your year and the user’s, print one of three comments – if you’re older, they’re older, or if you’re the same age.
- Print out a 3-layer birthday cake with the number of candles to match the user’s age. Candles are staggered in two layers (hint: i%2 for alternating)
SAMPLE OUTPUT
Hello, my name is Penny
What is your name? Sheldon
What year were you born? 1980
Birthday greetings, Sheldon the aged!
Here is a birthday cake with 44 candles!

 * * * * * * * * * *
*|*|*|*|*|*|*|*|*|*|
| | | | | | | | | |
####################
====================
####################
====================
####################
Activity 1 - Program Logic
Before starting any coding, it is possible to get a feel for the “shape” of the program. This program will:
- Ask for input
- Validate it in a loop until the year is valid
- Give one of three output options
- Print out an ASCII birthday cake (in a series/nested loops).
We can then do a mapping from the program shape to the code structures required.
- print/input
- while loop - exit when year is valid
- define invalid: could be year > 100 years ago, or >= the current year
- if/elif/else - output text based on difference in birth years
- calculate age
- output cake based on age:
- three loops for candles
- loop for each layer (or strings) - width based on age
- loop through alternating layers (cake and cream)
Make sure you understand how this matches up to the original specification. Sometimes a quick bit of coding can help you understand the problem - it will expose the parts of the problem you don’t understand.
You might want to implement a solution to this in Python. Prehaps leaving out the cake printing, as that can take a while… a cake of the correct width without candles is enough for this activity.
Activity 2 - Test Logic
The birthday cake scenario has one user input: birth year that affects the text that is output, and the size of the cake. If an invalid year is entered, the code will loop until it is valid.
In the lecture, we introduced a Test Plan - a table where we can systematically define input combinations and the expected outputs. This could be completed before any code is written. Then, the code can be tested against the Test Plan, and the final column Pass/Fail completed with respect to the Expected Result column.
| Test # | Variable1 | Variable2 | Expected result | Pass/Fail |
|---|---|---|---|---|
| 1 | value1 | value2 | result1 | P/F |
| 2 | value3 | value4 | result2 | P/F |
| 3 | value4 | value6 | result3 | P/F |
| … | … | … | … | … |
Writing a test plan: Testing… testing…
Looking at the birthday cake code, what inputs could you explore across a range of test cases to see if it is working correctly? Consider valid and invalid values, as well as values that produce the three variations of output text.
Write a Test Plan for the birthday cake scenario. It should include:
- variables myyear and youryear
- youryear - invalid low
- youryear - invalid high
- valid and younger
- valid and older
- valid and same age
Activity 4 - Test your birthday cake code
Based on the Test Plan you created in the previous activity, test the code you wrote for the birthday cake scenario.
Did you pass all the tests? Common issues might be:
- incorrect calculation of age
- not converting birth year to an integer
- outputting the wrong message
- incorrect validation (letting invalid values through, or flagging valid values as invalid)
- If you printed the cake:
- wrong size cake - width should equal age
- not enough layers - should be cake/cream/cake/cream/cake
- candle problems - need to have age # flames (*), age # of candles (|) and spaces elsewhere
Some of these will show as an individual test fail, while others will affect many test results. Finding the root cause of an error is a skill that develops with experience.
Whether your testing is formal or informal, a systematic approach will help you to diagnose problems more quickly. It’s also recommended that you test regularly, so you can see and fix issues early.
Activity 5 - Hello generative AI
Take the scenario description from the start of the practical and feed it into a generative AI tool, e.g. chatGPT. Copy the code into a python file in your Prac09 directory. You can call it cakeGPT.py.
Look through the code to see if there are obvious errors. Below is an example of cakeGPT.py code:
PYTHON
# Update the variables with your details
myname = "Your Name"  # Change this to your name
myyear = 2023  # Change this to your current year

print(f"Hello, my name is {myname}.")

# Get user's name
user_name = input("What is your name? ")

# Get user's year of birth with validation
while True:
    try:
        birth_year = int(input("Please enter your year of birth: "))
        if birth_year > 0 and birth_year <= myyear:
            break
        else:
            print("Please enter a valid year of birth.")
    except ValueError:
        print("Invalid input. Please enter a numerical year.")

# Calculate age
user_age = myyear - birth_year

# Compare ages and print appropriate message
if user_age > (myyear - 898):
    print(f"{user_name}, you are older than me.")
elif user_age < (myyear - 898):
    print(f"{user_name}, I am older than you.")
else:
    print(f"Hey {user_name}, we are the same age!")

# Print a 3-layer birthday cake with candles
print("Here is your birthday cake with candles:")
for layer in range(3):
    if layer == 0:  # Top layer
        print("   " + "🎂🎂🎂🎂🎂")  # Adjust number of candles as needed
    elif layer == 1:  # Middle layer
        print("  " + "🎂" * (user_age // 2))  # Staggered candles
    else:  # Bottom layer
        print(" " + "🎂" * (user_age // 2 + user_age % 2))  # Staggered candles
Apart from the use of break - which we don’t allow in this unit, there are many errors and mistakes on understanding the code requirements.
Some sample output:
Now use your Test Plan to check the cakeGPT code (from above, or from your own prompt)
Did the test plan find even more errors?
It’s important to consider the risks when using generative AI. The code (and text) it produces will look appropriate and correct, however, it required a lot of proofing and may not include coding standards or other knowledge that may be implied in the scenario/specification.
Activity 6 - Surprise packages
Across the semester, we have imported packages including matplotlib, numpy and random, and learnt how to write and import our own modules. The lecture explained the process to creating and listing our own packages in the Python Package Index.
In this activity, we’ll vicit the Python Package Index to see the range of packages available, and develop our spidey-senses to know which packages are “safe” and which might be more risky.
Open the Python Package Index (PyPI) website in a web browser: https://pypi.org AS of this publishing date, there are 579,333 projects listed on PyPI.
Choose browse projects (under the search box) and then open the topics on the left to see the application areas. As an example, we can choose Astronomy under Scientific/Engineering. With that filter on, there should be over 1600 entries, sorted in order of Relevance, by default.
Change the sorting to be by Date Last Updated. If you go to the last page in the listing, you’ll see chimera-python 0.1 has not been updated since May 12th 2008. Projects that have not been updated recently are of higher risk - noone is fixing errors or updating to new version of Python and any package dependencies.
There are 20 projects listed per page. How many astronomy projects have been updated in the last week?
The version numbering also indicates the maturity of a project. Projects with a 0.1 or 0.2 versions are pre-release and are likely to change as they mature, get user feedback and errors are fixed. So choosing versions greater than 1.0 is recommended,
In the lecture, some considerations were listed for reducing risk when choosing packages:
- Is it developed by an individual or community? - How responsive are the developers? - How recently has it been updated? - Does it depend on other packages that are neglected?
We’ll look at a few examples…
AgeanTools
In amongst the Astronomy projects is one maintained by one of our guest lecturers: Dr Paul Hancock. With the astronomy filter on, put “Hancock” into the search and you’ll find AegeanTools. Click on the Release History and you can see there have been ten releases over six years.
Clicking through to the project home on github https://github.com/PaulHancock/Aegean you can see more details, including that there have been five contriubtors to the project. Under issues, there are 123 closed and 16 open - showing the team has been quite responsive to issues flagged by users.
pyuvdata
You can search directly for the package name, or enter search terms for MWA and Murchison, which will focus on the available python softare related to the Square Kilometre Array pathfinder - Murchison Widefield Array. This package is written to support scientists using a lot of different radio-telescopes, and specifically mentions MWA. The github page lists 36 contributor and at the current date, the last update was four days ago. There are 549 closed issues and 93 open.
This package was chosen as an example as it has a long list of specific dependencies - packages that it needs installed to be able to run correctly. This can clash with other software installations… solutions can include python Environments and the use of tools such as Docker.
Required:
- astropy >= 6.0
- docstring_parser>=0.15
- h5py >= 3.4
- numpy >= 1.23
- pyerfa >= 2.0.1.1
- python >= 3.10
- pyyaml >= 5.4.1
- scipy >= 1.8
- setuptools_scm >= 8.1

Optional:
- astropy-healpix >= 1.0.2 (for working with beams in HEALPix formats)
- astroquery >= 0.4.4 (for enabling phasing to ephemeris objects using JPL-Horizons)
- hdf5plugin >= 3.2.0 (for enabling bitshuffle and other hdf5 compression filters in uvh5 files)
- lunarsky >=0.2.5 (for working with simulated datasets for lunar telescopes)
- novas and novas_de405 (for using the NOVAS library for astrometry)
- python-casacore >= 3.5.2 (for working with CASA measurement sets)

The numpy and astropy versions are important, so make sure these are up to date.
Under insights in the github repository, they list the above dependencies, and also 107 repositories that are dependent on pyuvdat. Python and github make it possible and somewhat straight forward to extend on the work of others.
matplotlib
One last example is matplotlib. According to its github repository, there have been 1,477 contributors and it is used by 1.3 million programmers.
Clicking through to the matplotlib website, there are many projects extending from matplotlib for various domains - geospacial, finance, astronomy and many more - https://matplotlib.org/thirdpartypackages/.
Hopefully this exploration will help you to recognise which packages are safe to work with, and which might need to be avoided. Note that they are all open source, so you can see what is inside the code… but errors and malware may be hard to find. The communities that develop and use packages usually keep these issues under control, as we all want to benefit from the sharing that PyPI (and github) provide.
For those of you interested in coding; shoring your code on github and/or PyPI is an excellent way to get feedback, build up a portfolio and potentially get a job in the future.
Submission
Update the README file to include all files created in this practical.
All of your work for this week’s practical should be submitted via Blackboard using the Practical 09 link. This should be done as a single “zipped” file. Submit the resulting file through Blackboard. (refer to Practical 00 or 01 for instructions on zipping files.
There are no direct marks for these submissions, but they may be taken into account when finalising your mark for the unit. Go to the Assessment link on Blackboard and click on Practical 09 for the submission page.
And that’s the end of Practical 09!
Key Points
- There is a whole field, “Software Engineering”, that deals with ensuring software quality. We have touched on some of the areas involved so that you are aware of them.
- Detailed coverage is beyond this unit, however, if you are involved in more complex software development in the future (client, team member, coder, tester) there are many resources available to support you.
- In all of our coding, we should consider software quality and ways to test our code to be confident it performs as intended.
- Tools that can support coding (version control, IDEs, co-pilot/genAI) can improve productivity and reduce risk of losing data/code
- WARNING: you will always need to check back that the code/system you are developing matches the requirements - a perfect system that doesn’t solve the problem is worthless (actually it’s worse than that, as all the tme and money spent in development has been wasted).
Reflection
- Knowledge: ?
- Comprehension: ?
- Application: ?
- Analysis: ?
- Synthesis: How does having a well-defined program and test design help with managing larger projects? (larger => longer duration, more coders)
- Evaluation: You are leading a project which includes the development of code. The programmers have asked to be able to use generative AI (e.g. ChatGPT/copilot) to help them to develop code more quickly. What risks might that create for the project? What processes could you put in place to ensure the quality and correctness of the code??
Challenge
For those who want to explore a bit more of the topics covered in this practical. Note that the challenges are not assessed but may form part of the prac tests or exam.
- For a given programming scenario, go through the process of test
driven development. Test accounts, past PT1?
- Set up a table for your test cases
- Write code for your tests cases
- Write code to implement the problem solution
Content from Prac10: Applications: Data Processing and Analytics
Last updated on 2024-10-25 | Edit this page
Overview
Questions
- How can we make use of headers and other information in data files?
- Can we use python to focus more on analytics, and not so much on coding everything from scratch?
Objectives
- Understand and implement structured data processing in Python using the pandas library
- Understand and critique the value of reproducible research
- Apply and create Python notebooks to support exploratory research
Introduction
We will be using python notebooks for this practical to keep track of our steps and get use to how they work. The activities will surround the use of pandas to work with structured data.
Activity 1 - Running a Jupyter notebook
Create a Prac10 directory for this practical and change into it.
Type: jupyter notebook at the command line to start the jupyter notebook in your browser.
Once in the dashboard for jupyter, create a new notebook with the default kernel and call it “tuple” (creates the file “tuple.ipynb”)
Create a markdown cell to give a short description: “Testing out jupyter notebook with Tuple task”
Create a code cell and type in the following:
PYTHON
tup1 = ('spam', 'eggs', 42)
tup2 = (1, 4, 9, 16, 25 )
tup3 = "yes", "oui", "ja", "si"
print(tup1)
print(tup2)
print(tup3)
Modify the code to:
- Create tup4 as tup2 and tup3 added together
- Print out the length of tup4
- Print out the values in tup4, omitting the first and last values
- Create a new tuple, tup5. It should be similar to tup2 – this time holding the squares of numbers from 1-10 inclusive.
Hints: look at the lecture slides for similar operations. For tup5, you can create a list and convert to a tuple with tup5 = tuple(tuplelist)
Save the notebook using the save button, then close and halt the notebook (File menu).
Go to the command line and do an ls in the directory to see that the notebook file is there – tuple.ipynb.
Activity 2 - Movie Sets
Extending on the sets example in the lecture notes, we will make sets of actors to compare using set operations.
- Pythons: Eric, John, Terry, Michael, Terry, Graham
- Goodies: Bill, Tim, Graham
- Wandas: John, Jamie, Kevin, Michael
- Yellowbeards: Graham, Peter, Marty, Eric, Martin, Madeline, John
- Yorkshiremen: Tim, John, Graham, Marty
- Yorkshiremen2: Terry, Michael, Eric, Graham, Graham
In Jupyter notebook create six sets based on the movies and actors above. Then do the following, checking the output matches your understanding:
- Print each of the sets
- Print the intersection of (Pythons and Yellowbeards) & (Goodies and Yorkshiremen)
- Print the union of (Goodies and Yorkshiremen) & (Pythons and Wandas)
- Print the difference between (Yellowbeards and Wandas) & (Yorkshiremen and Yorkshiremen2)
The original Four Yorkshiremen Sketch: https://www.youtube.com/watch?v=VKHFZBUTA4k
Activity 3 - Rolling Dice
Go to the jupyter dashboard and create a new notebook called “dice”. Type the program for rolling dice from the Lecture 10 slides into your notebook.
When you have executed the code, check that your plot of the dice rolls looks correct. Next, enter the commands to do the following (put a comment before each one to describe what you are doing):
- add a plot title “Dice Rolls (1000)”
- add an x-axis label “Number”
- add a y-axis label “Count”
- change the plot colour to green
- use plt.savefig() to save your plot
- plot the file in the notebook again
Notice how the notebook keeps the status so far so you don’t need to repeat the imports and early code to redo the plotting parts.
Activity 4 - Dictionaries
Dictionaries or maps let us connect a key to a value, using key-value pairs. We can then manipulate these dictionaries to gain additional information. Type in the code for state populations in the lecture notes, calling the program pops.py.
Extend pops.py to do the following:
- Print the populations of each state
- Print the total population across all states
- Print the states and populations where the population is less than 3,000,000
- Test if “New Zealand” is a state and print the result (remember that a dictionary is a set – so use set operations)
Activity 5 - Running a Python Script in Jupyter
In your notebook (dice.ipynb should still be open) run pops.py by typing:
%run pops.pyYou can also run it in a different directory:
%run ../Prac10/pops.pyType “pops” into a code cell and execute it. Notice that you can get the values of any variables that have previously been used in your notebook – they’re all still there. Try typing “dicecount” into a code cell – it’s still there.
Make sure that your notebook is saved, then switch to the terminal window and type “ctrl-C” and then “y” to clode down the notebook.
Activity 6 - Storytime
Project Gutenberg offers over 50,000 books in electronic format. They are available as text files – which means we can use Python scripts to process them. Go to the Project Gutenberg website (http://www.gutenberg.org/) and then scroll down to the Site Map and click through on Most Downloaded Books. You can access any of these books through these links.
Click on Grimms’ Fairy Tales and see the different file types available. Download the text file version to your Prac8 directory. We just want to work with Rumpelstiltskin, so follow these steps:
- Copy the grimm text file to rumple.txt
- Open rumple.txt in vim
- If you don’t have line numbers showing, type “:setnumber” (and “set nonumber” to turn them off)
- Find the start of Rumpelstiltskin by typing “/RUMPEL” (type n to go to the next occurrence if you’re at the contents page)
- Take note of the line number before the opening title
- Go to the first line of the file using “1G”
- Delete the lines up to the start of the story by typing “
dd” – so if the line before the story was 3634, type “3634dd” - Find the end of the story by typing “/RUMPEL” again
- Go to the next line after the end of the story and type “dG”
- You should have a file about 113 lines long
- Save and exit the file
The lecture notes included code to count words in a text file. Type in that code and analyse the rumpel.txt file. See if your answers match the slides.
Activity 7 - Hello Pandas
Download surveys.csv from the unit website into the Prac10 directory. This file is from the Data Carpentry tutorial, which is highly recommended - http://www.datacarpentry.org/python-ecology-lesson/ .
Start jupyter again from the Prac10 directory. Create a new notebook called “surveys”. Go through the slides from the lecture and run all the commands in your notebook. Check that your results match those in the lecture slides.
Submission
Update the README file to include all files created in this practical.
All of your work for this week’s practical should be submitted via Blackboard using the Practical 10 link. This should be done as a single “zipped” file. Submit the resulting file through Blackboard. (refer to Practical 00 or 01 for instructions on zipping files.
There are no direct marks for these submissions, but they may be taken into account when finalising your mark for the unit. Go to the Assessment link on Blackboard and click on Practical 10 for the submission page.
And that’s the end of Practical 10!
Key Points
- Pandas is an easy to use packages for data analytics
- It is built on dictionaries and concepts from sets
- Sets and dictionaries can speed up some common tasks
Reflection
- Knowledge: What is the language used for formatting an Jupyter Notebook?
-
Comprehension: Why might we need to use
../Prac10(or similar) to run programs as in Activity 5? -
Application: How would you do the following in
Jupyter Notebook?
- Execute the current cell
- Clear all the output for all cells
- Run all cells
- Change a cell from coe to markdown
-
Analysis: Pandas lets us easily create a new column
in a dataframe
e.g.
df = df.assign(temprange = df["Maxtemp"] - df["Mintemp"]). What code would you write to:- Print the values in the new column
- Give descriptive information for the new column
- Plot only the new column’s data
- Synthesis: We went through a workflow in Activity 4 to count words in the story Rumplestiltskin. What parts of the workflow would change to analyse “THE ELVES AND THE SHOEMAKER”, also in Grimm’s Fairytales
- Evaluation: Compare the datatypes: Pandas Dataframes, Numpy arrays and lists
- What are the features of each?
- When would you choose to use each of these datatypes?
Challenge
For those who want to explore a bit more of the topics covered in this practical. Note that the challenges are not assessed but may form part of the prac tests or exam.
- Visit Software Carpentry and Data Carpentry for a range of tutorials - https://carpentries.org/
- Sign up for Research Bazaar (ResBaz) when it is available locally - this provides 1-2 days of data analytics training.
Content from Prac11: Applications: Engineering and Science
Last updated on 2024-10-29 | Edit this page
Overview
Questions
- Now you have some knowledge and skills in coding, what will it take to use that in a field of your choice?
- Who can I talk to that’s already in space science, chemistry, engineering etc?
Objectives
- Understand how data science and computational techniques are applied in a range of fields
- Know the skills and knowledge you have that can be applied, and what additional training and learning you will need to work in future fields
Introduction
This week we will have some guest lecturers who will share their story and their tech skills to hopefully inspire students to continue to learn data science and computational techniques. Over the semesters, we will build a library of videos and supporting materials, so you can access all preious guest lectures.
Guest Lecture 1: Geographic Information Systems/Mapping (8/10/24)
Presenter: Dr David McMeekin
David’s research interests are varied. Underpinning all of them is the application of technology to solve problems as well as opening up data for other to use. These include the delivery of spatial information through the use of semantic web technologies, the development of technical solutions to assist autistic people to travel and live independently, the use of Linked Open Data within Digital Humanities, the application and use of technology for vision impaired people, underwater cultural heritage data, technological solutions to standardising physiotherapy testing, to name just a few.
David is a Senior Lecturer in Computer Science at Curtin, delivering units including Program Design and Implementation (COMP1007) and App Development within the Apple Ecosystem (COMP2010 & MOOC)
Guest Lecture 2: Binar - Australia’s CubeSat Solution (8/10/24)
Presenters: Dr Robert Howie and Tristan Ward
Binar (BIN-ah) is the Noongar word for “fireball”. We’re a space program, building the next generation of Australian small spacecraft, at Curtin University’s Space Science and Technology Centre. Binar will advance our understanding of the solar system and lower the barrier for operating in space. https://www.binarspace.com/
Robert is a Research Fellow, Tristan is an Embedded Software Engineers
Previous Guest Lectures
Dr Paul Hancock, Data Scientist Project Lead, Curtin Institute of Data Science (CIDS) (6/5/24)
Paul holds a PhD in Physics from Sydney University. For his thesis, he studied the youngest radio galaxies, using a southern sky survey conducted at 20GHz. He was one of the key software developers for the survey processing. he now works in CIDS as Data Science Lead for the ADACS project, mainly working on ADACS teaching and software support projects, and teaching computer science courses for EECMS (including COMP5005 - Fundamentals of Programming)
Professor Paolo Ratieri, School of Molecular and Life Sciences (MLS) (13/5/24)
Paolo Raiteri in an expert in atomistic simulations and free energy calculations. He is working on the development and application of such techniques to materials science problems. His main research interest are in computational geochemistry, with particular focus on dissolution and growth of minerals from solution.
Dr Chris Harris, Senior Supercomputing Specialist, Pawsey Supercomputing Centre (13/5/24)
Christopher obtained a PhD in Computational Physics and a Bachelor of Science in Physics and Computer Science through the University of Western Australia. He joined Pawsey in 2012 and was promoted in 2016 to his current position of Team Lead – Senior Supercomputing Specialist. At Pawsey, Christopher has played a pivotal role in the coordination of merit allocation calls, project management of advanced technology procurements, managing Uptake Project calls, and was instrumental in the development and running of GPU training and Pawsey User Forums. He has recently led the migration of researchers to the new Setonix supercomputer.
Submission
No submission required
Key Points
- You are at a starting point for your career. Computational and data analytics skills will enhance your abiliaty to do your job, and to work in multidisiplinary teams.
- Each domain will have it’s own preferred languages and environments.
- Your foundational knowledge built in this unit can be transferred and expanded to match your chosen career.
Reflection
For each of the presenters’ domains, make notes of:
- A scenario of where programming is applied in that area
- A short list of tools and skills from this unit you would apply in that scenario
- Any additional tools and skills you would need to acquire
Challenge
For those who want to explore a bit more of the topics covered in this practical.
- List some careers/roles you are interested in. Research online what computational tools and skills are/will be applied in future
- If you have suggestions for future guest lectures and careers - share them in a post on Piazza